
I’ve been maintaining this blog for a while, but as it’s quite time-consuming, I’ve decided to put it on a temporary hiatus.
If I secure publisher funding and gain more flexibility with my schedule, I may resume updates here.
Until then, I’ll be sharing progress updates primarily via social media.
Development will continue, and I truly appreciate your continued support.
未分類
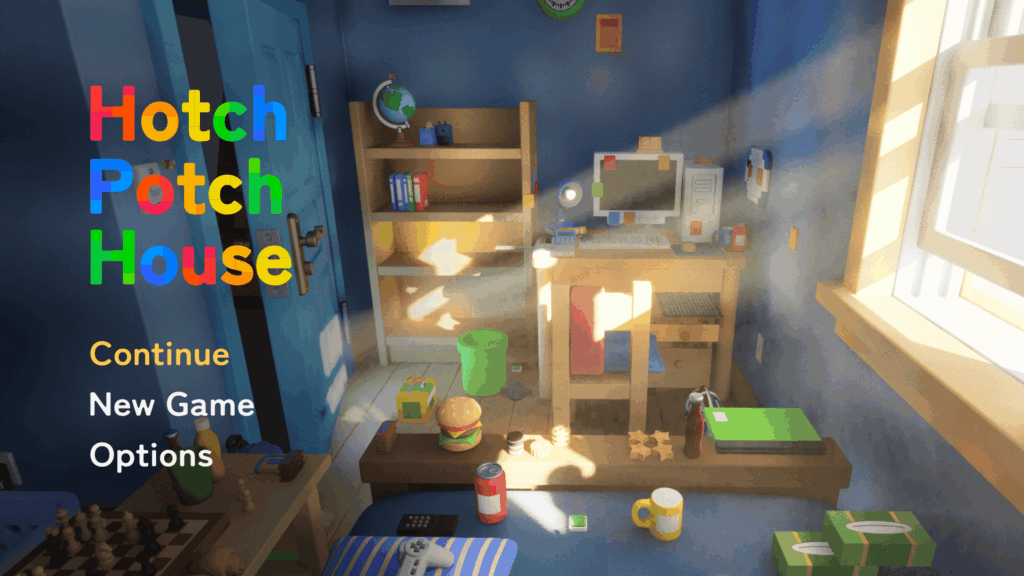
Hotch Potch House Blog: Jan, 2026
It is now 2026.
This time is a special combined issue, December 2025 plus January 2026.
To be honest, it is because I was too busy with work to find time to write.
All right, starting with December.
In December, the results of the Epic MegaGrants were announced.
For Hotch Potch House, this was my third attempt, and the result was…
I wrote it further down below.
Here is what this issue covers.
Also, starting this month, there will be a table of contents.
Of course, you can click an item to jump to that section.
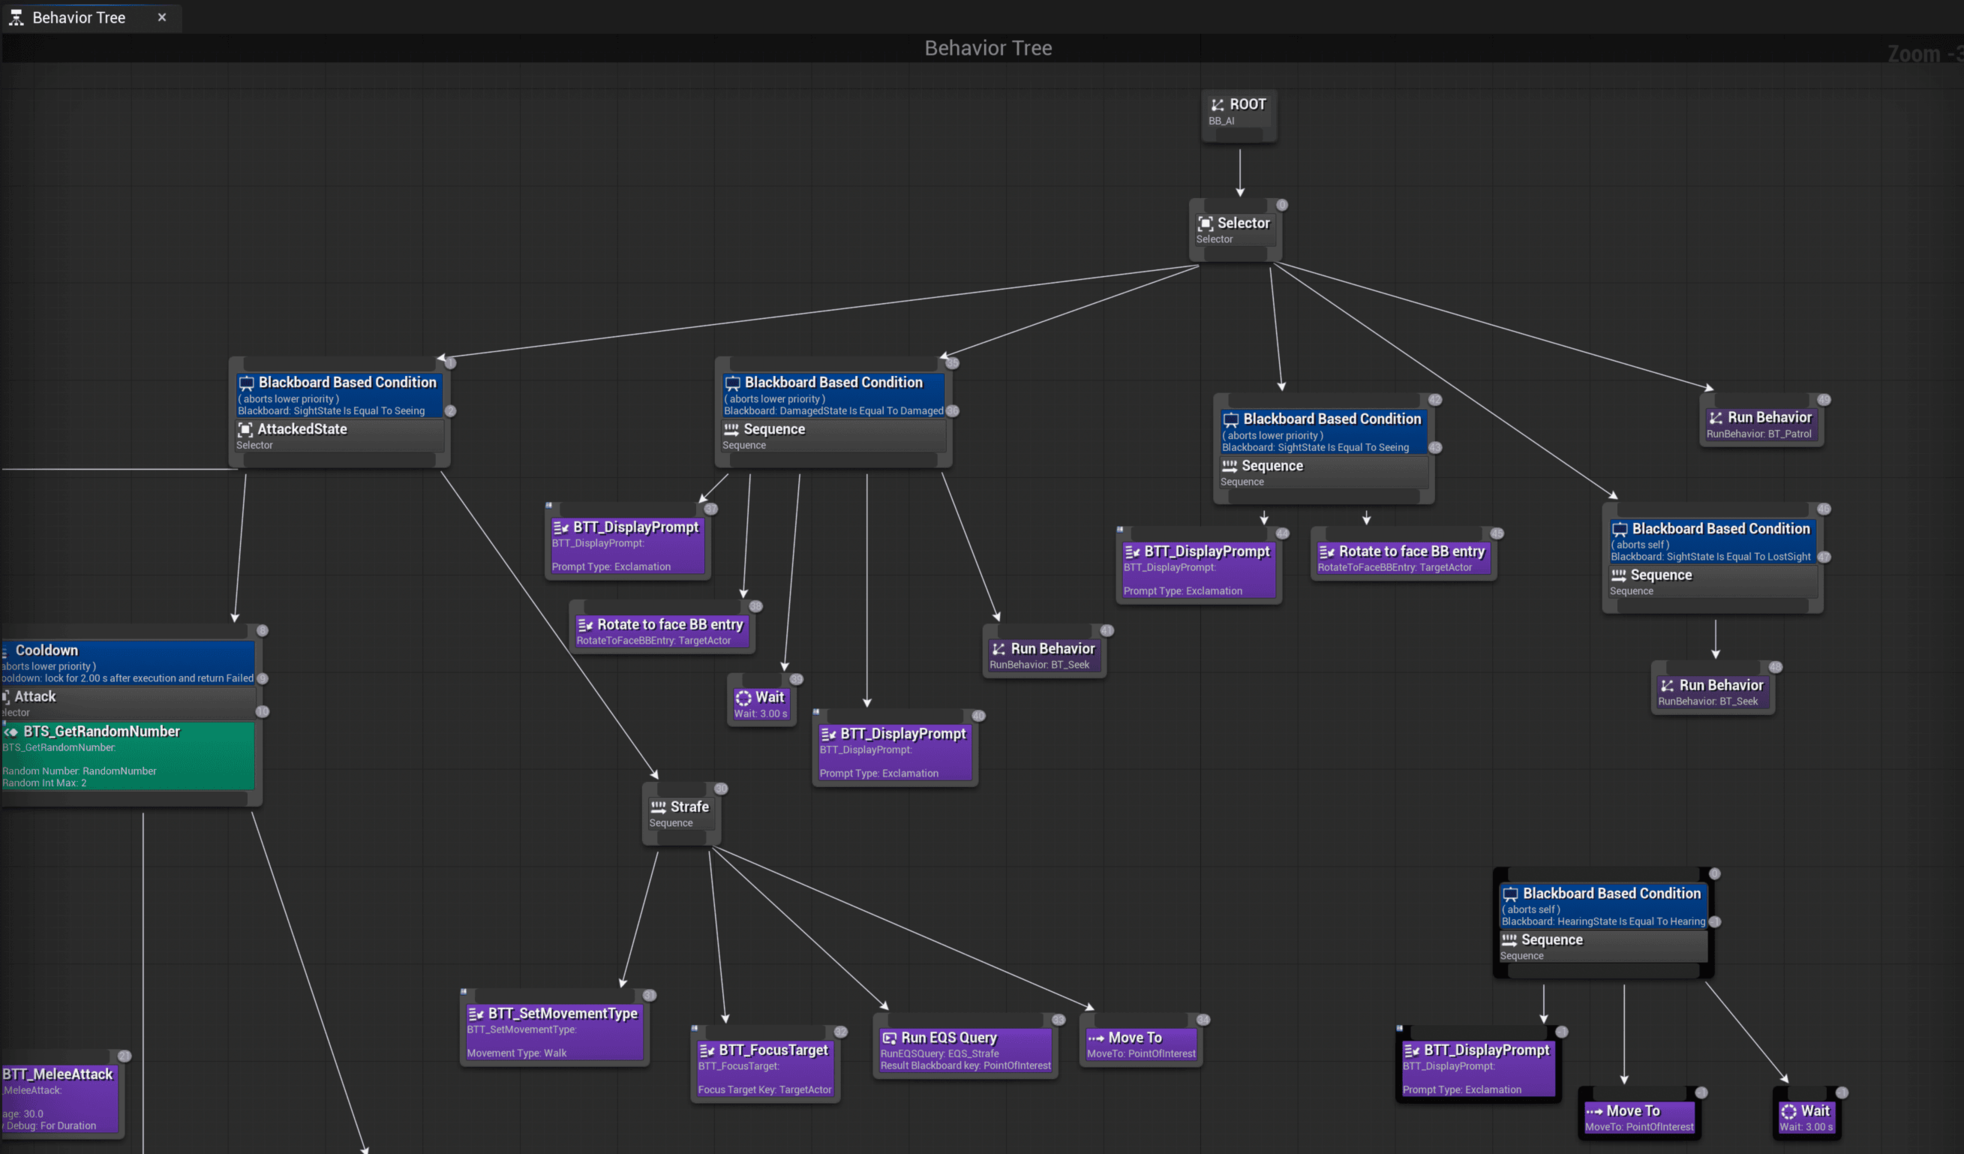
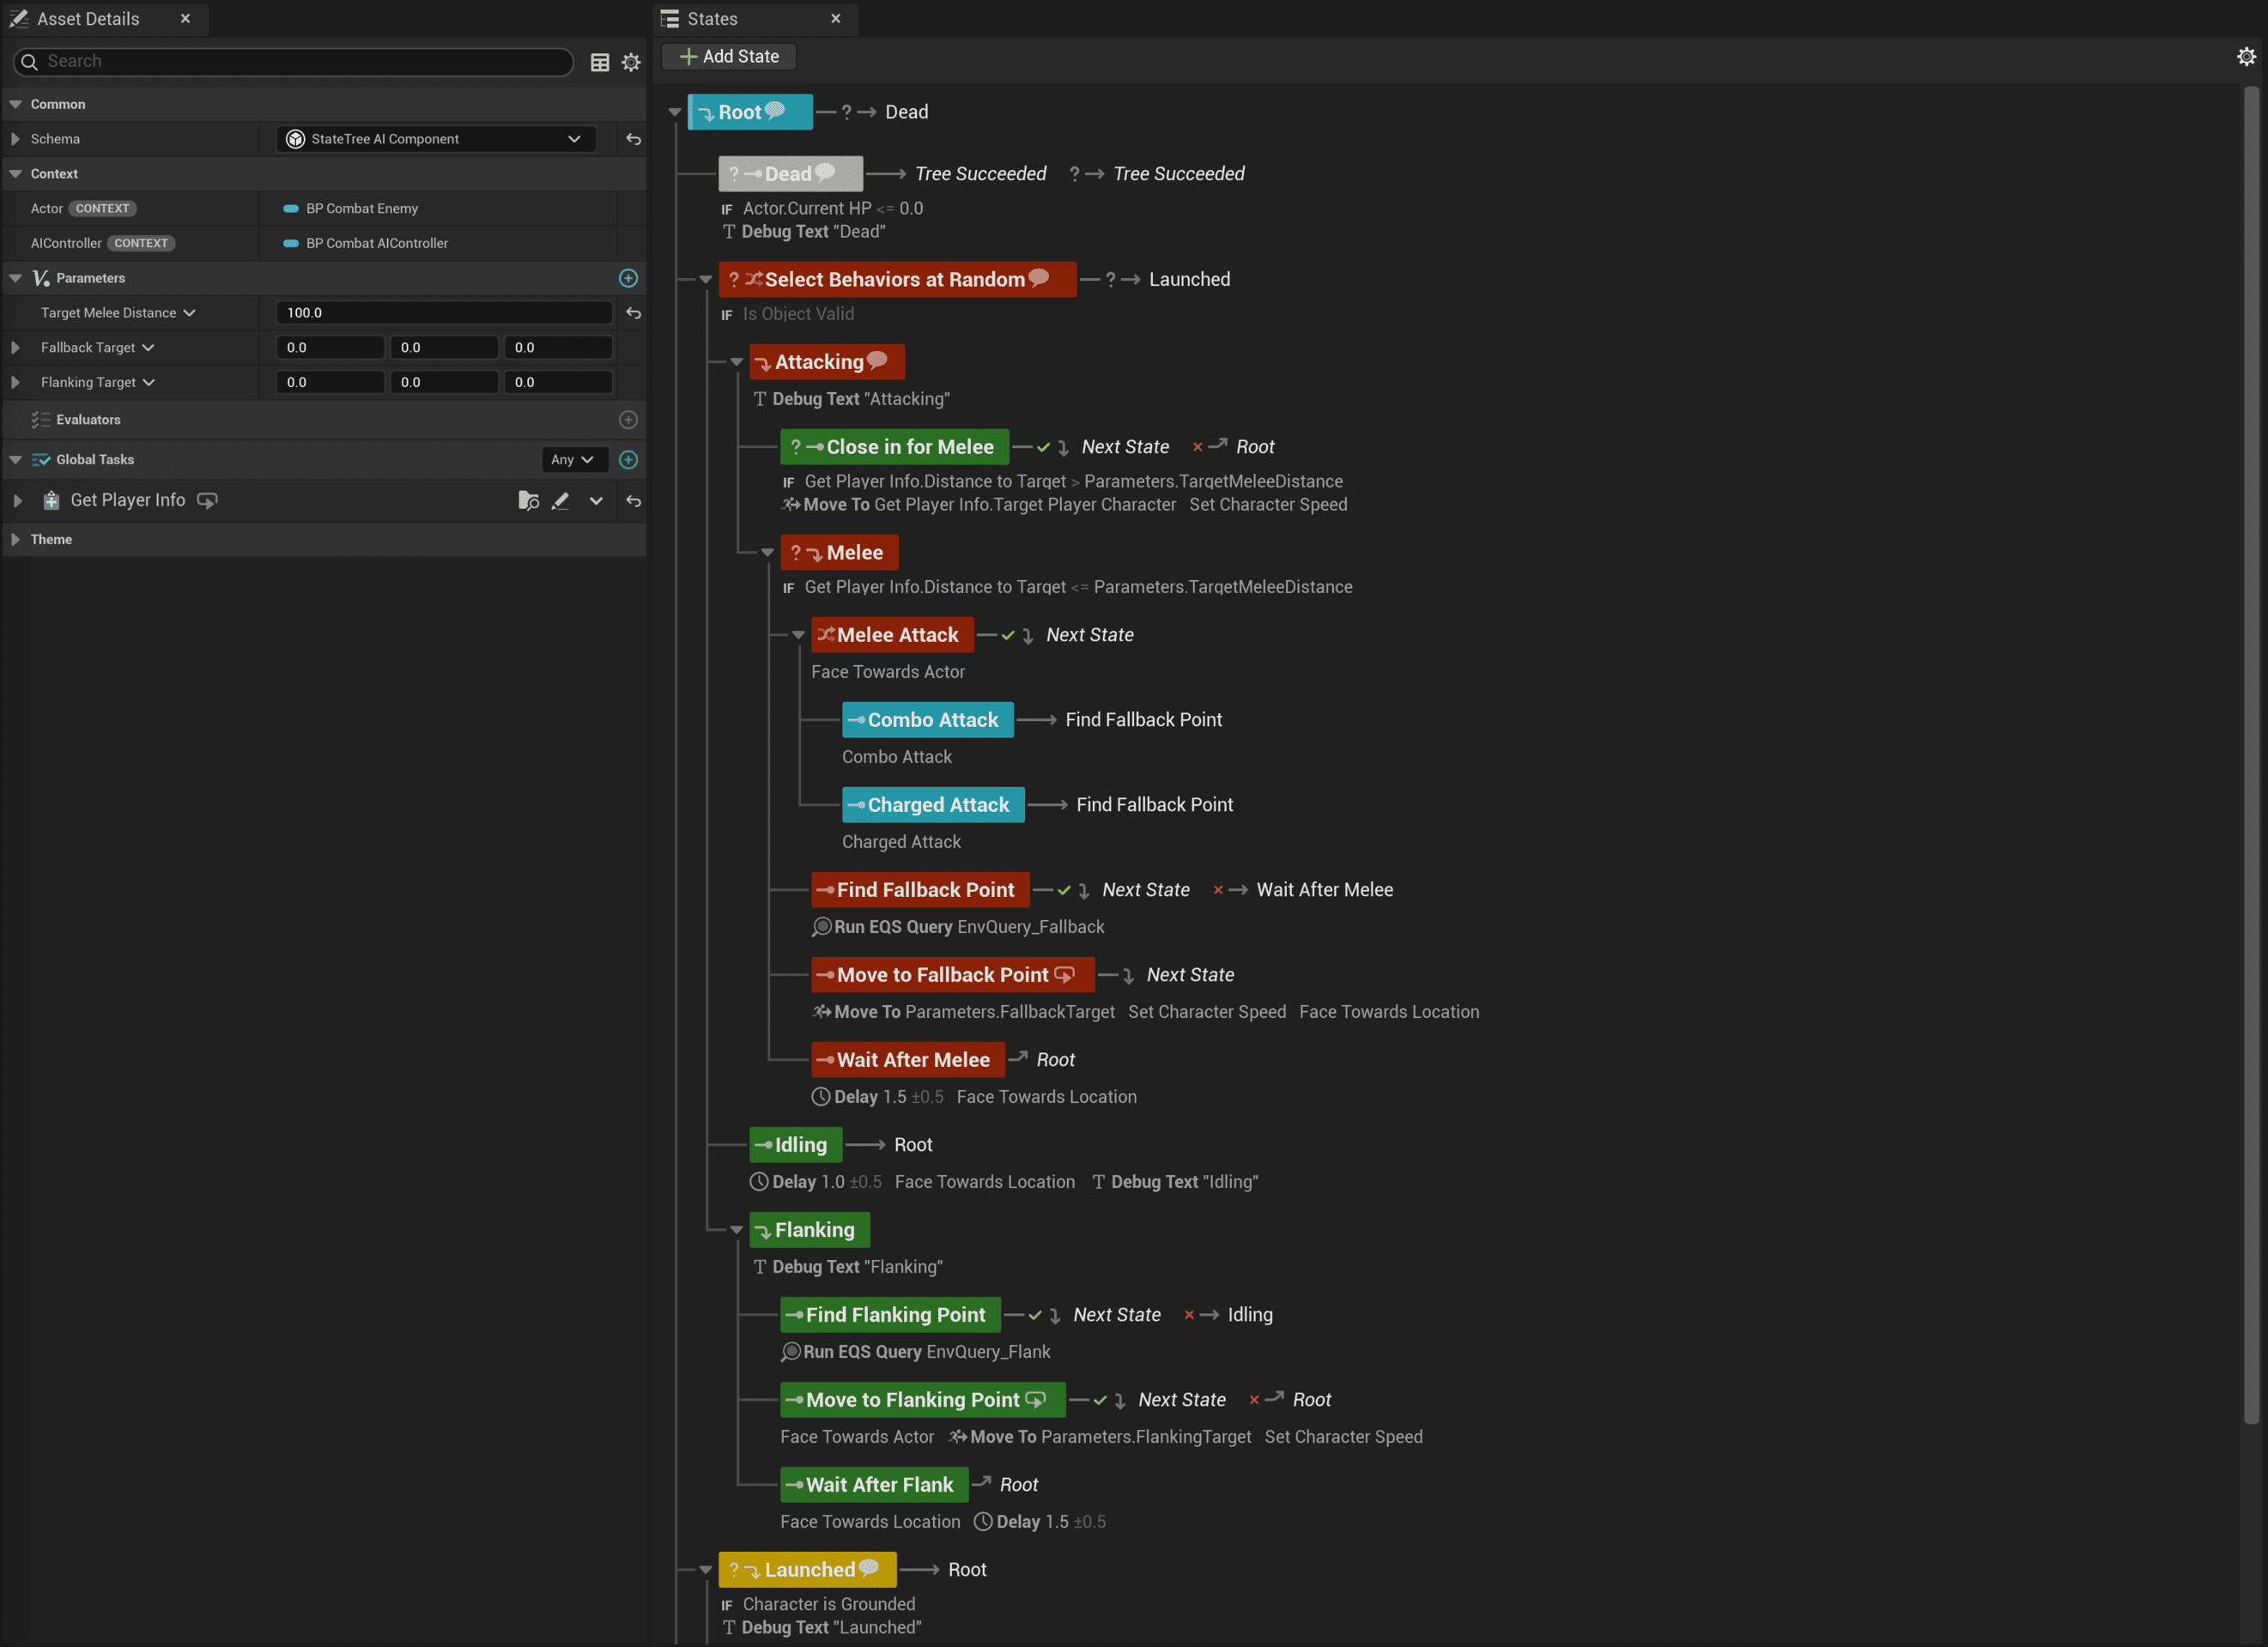
●Switching to State Tree
●Major Collision Overhaul
●Shared Rig
●MegaPlants
●Others
●Future Plans
●Switching to StateTree
It feels like I have been talking about this forever, but I finally finished migrating my AI logic to StateTree(ST)
It went about three times more smoothly than I expected.
For the regular enemies, I ported over the logic I had built for another project.
For the bosses, I rebuilt everything from scratch.
What I love about ST is the clean, well-organized UI. It looks great.
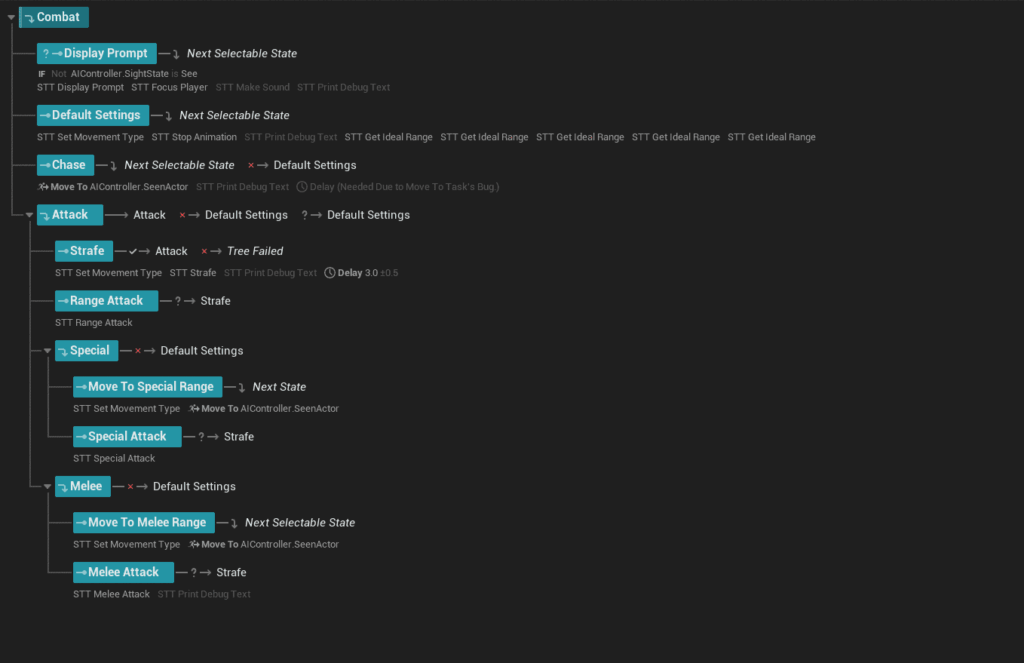
Keeping things tidy is extremely important in game development, so this change is a big deal for me.
Debugging also became much easier thanks to the dedicated debugger that was added.
Before I started, I was already feeling discouraged because I expected a lot of trouble, but the migration ended up being smooth with almost no issues.
That said, the current setup is still not very flexible, and there is plenty of room for improvement.
To fix that, I first need to lock down what kinds of enemies I will have and how they move, so I have been doing a lot of sketches and brainstorming.
I cannot really show much yet, so I will save it as something to look forward to after release.
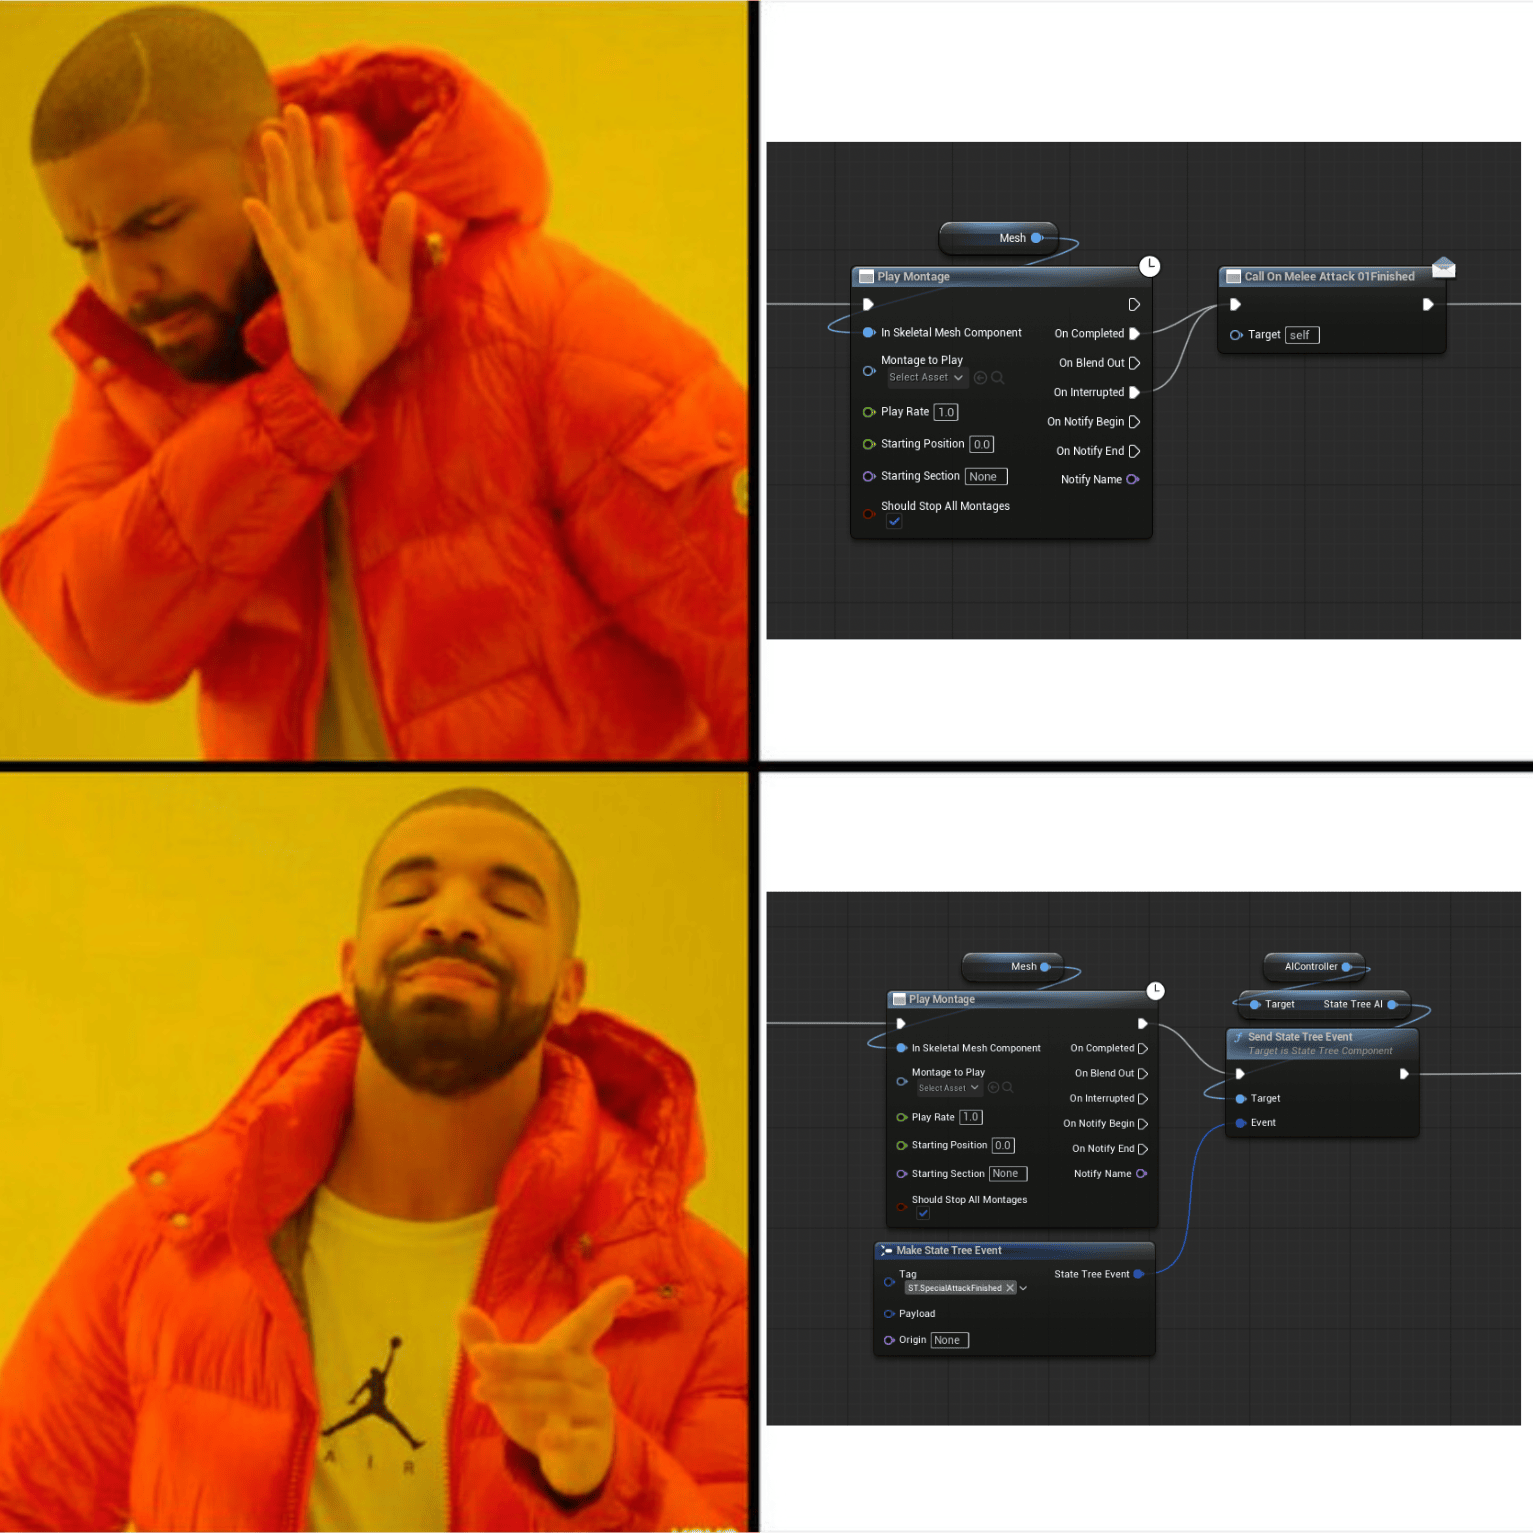
On a slightly more technical note, one thing that makes me personally happy about switching to ST is that I can trigger events using Gameplay Tags.
With Behavior Tree, as far as I know, there was no better option, so I reluctantly used Event Dispatchers.
The problem is that this requires hard references, which hurts modularity.
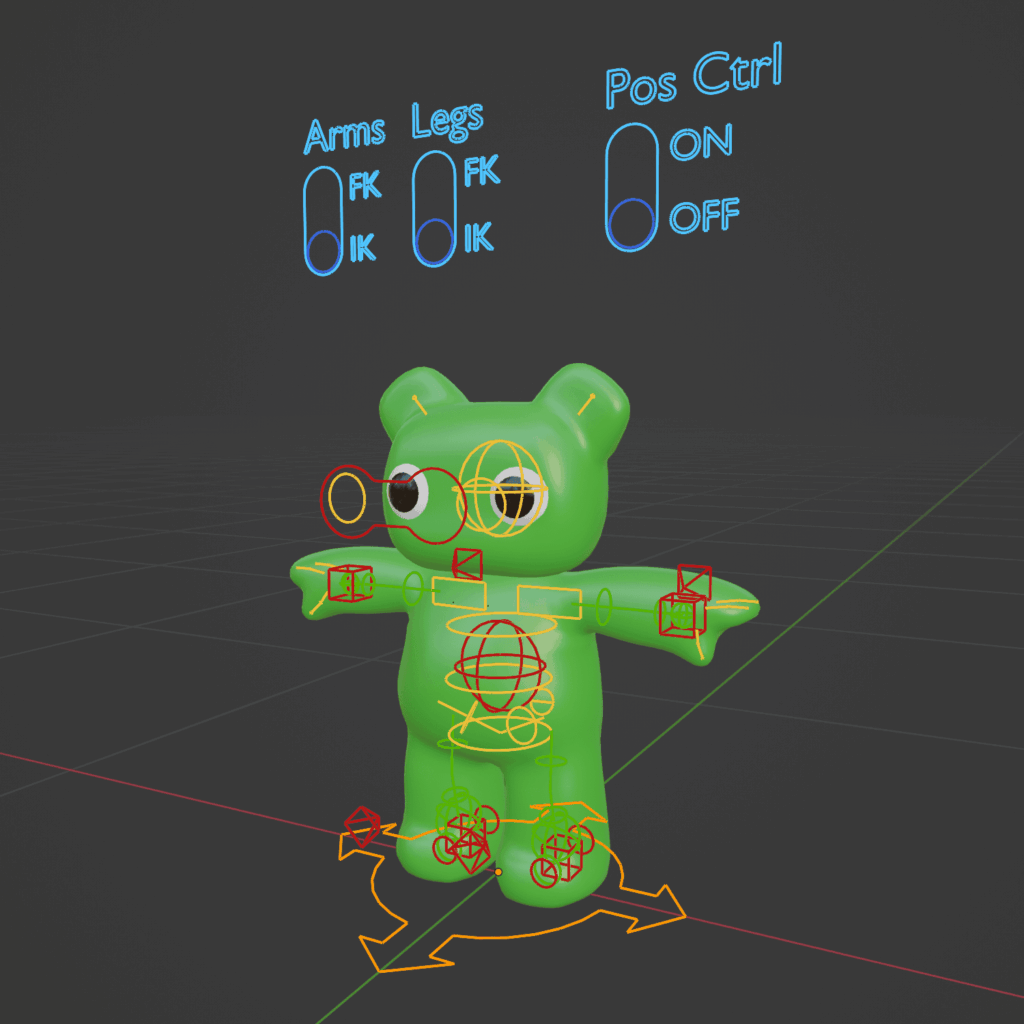
By the way, this is the boss I made quite a while ago. It is finally getting its moment, and he is happy about it.
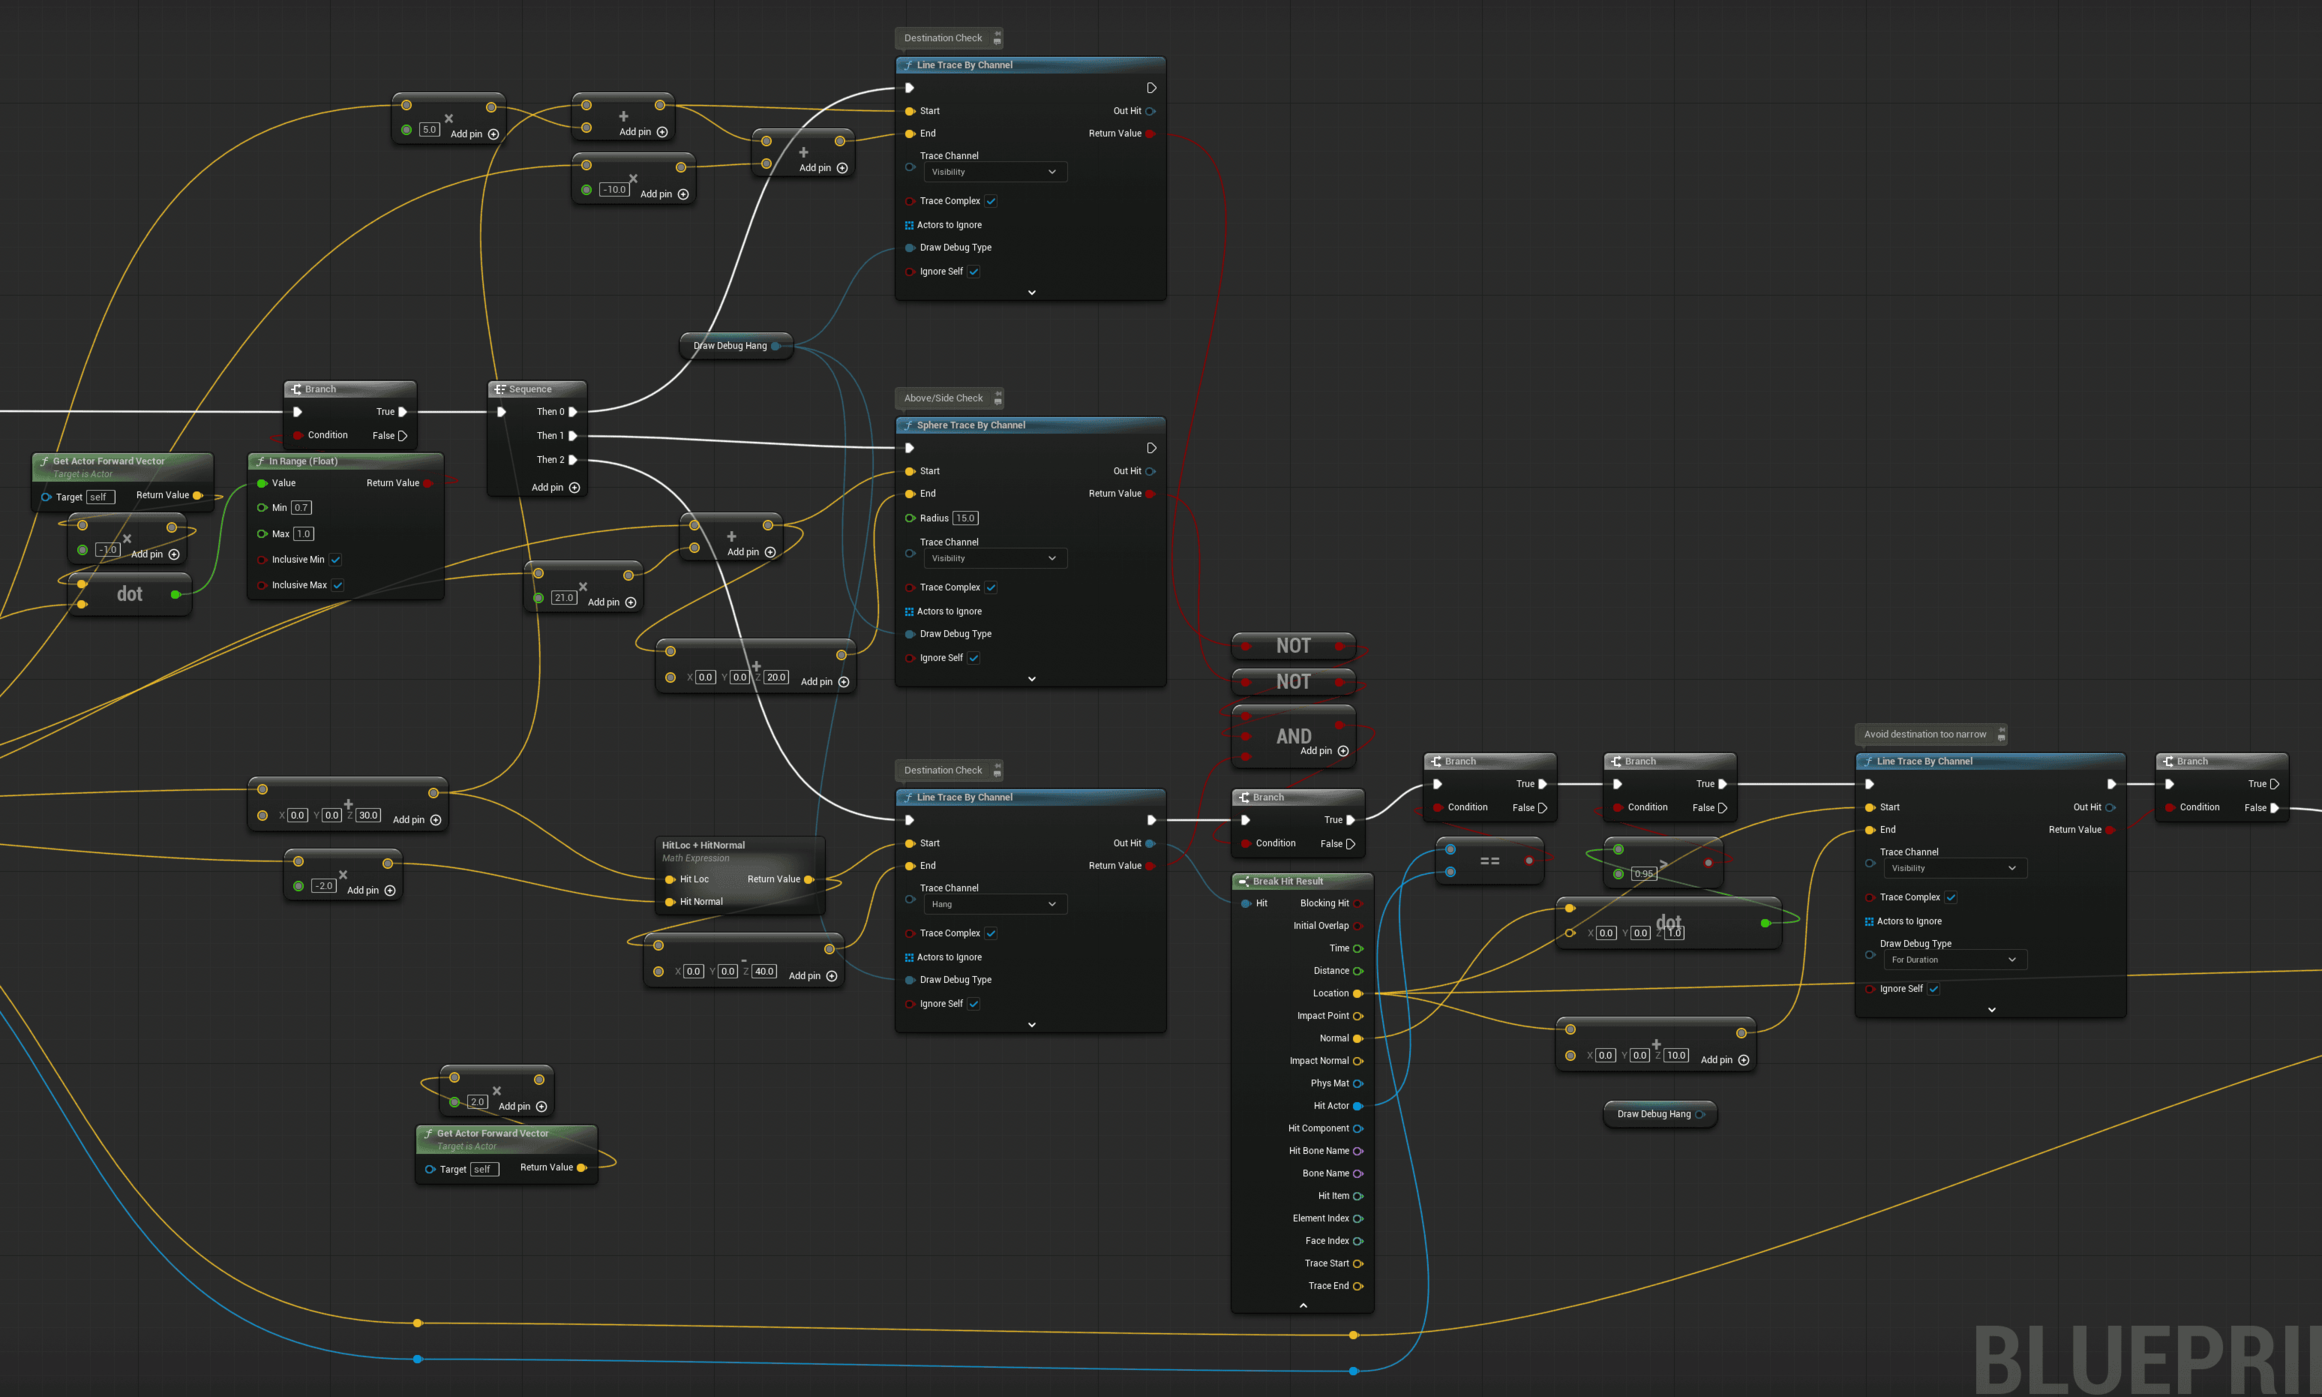
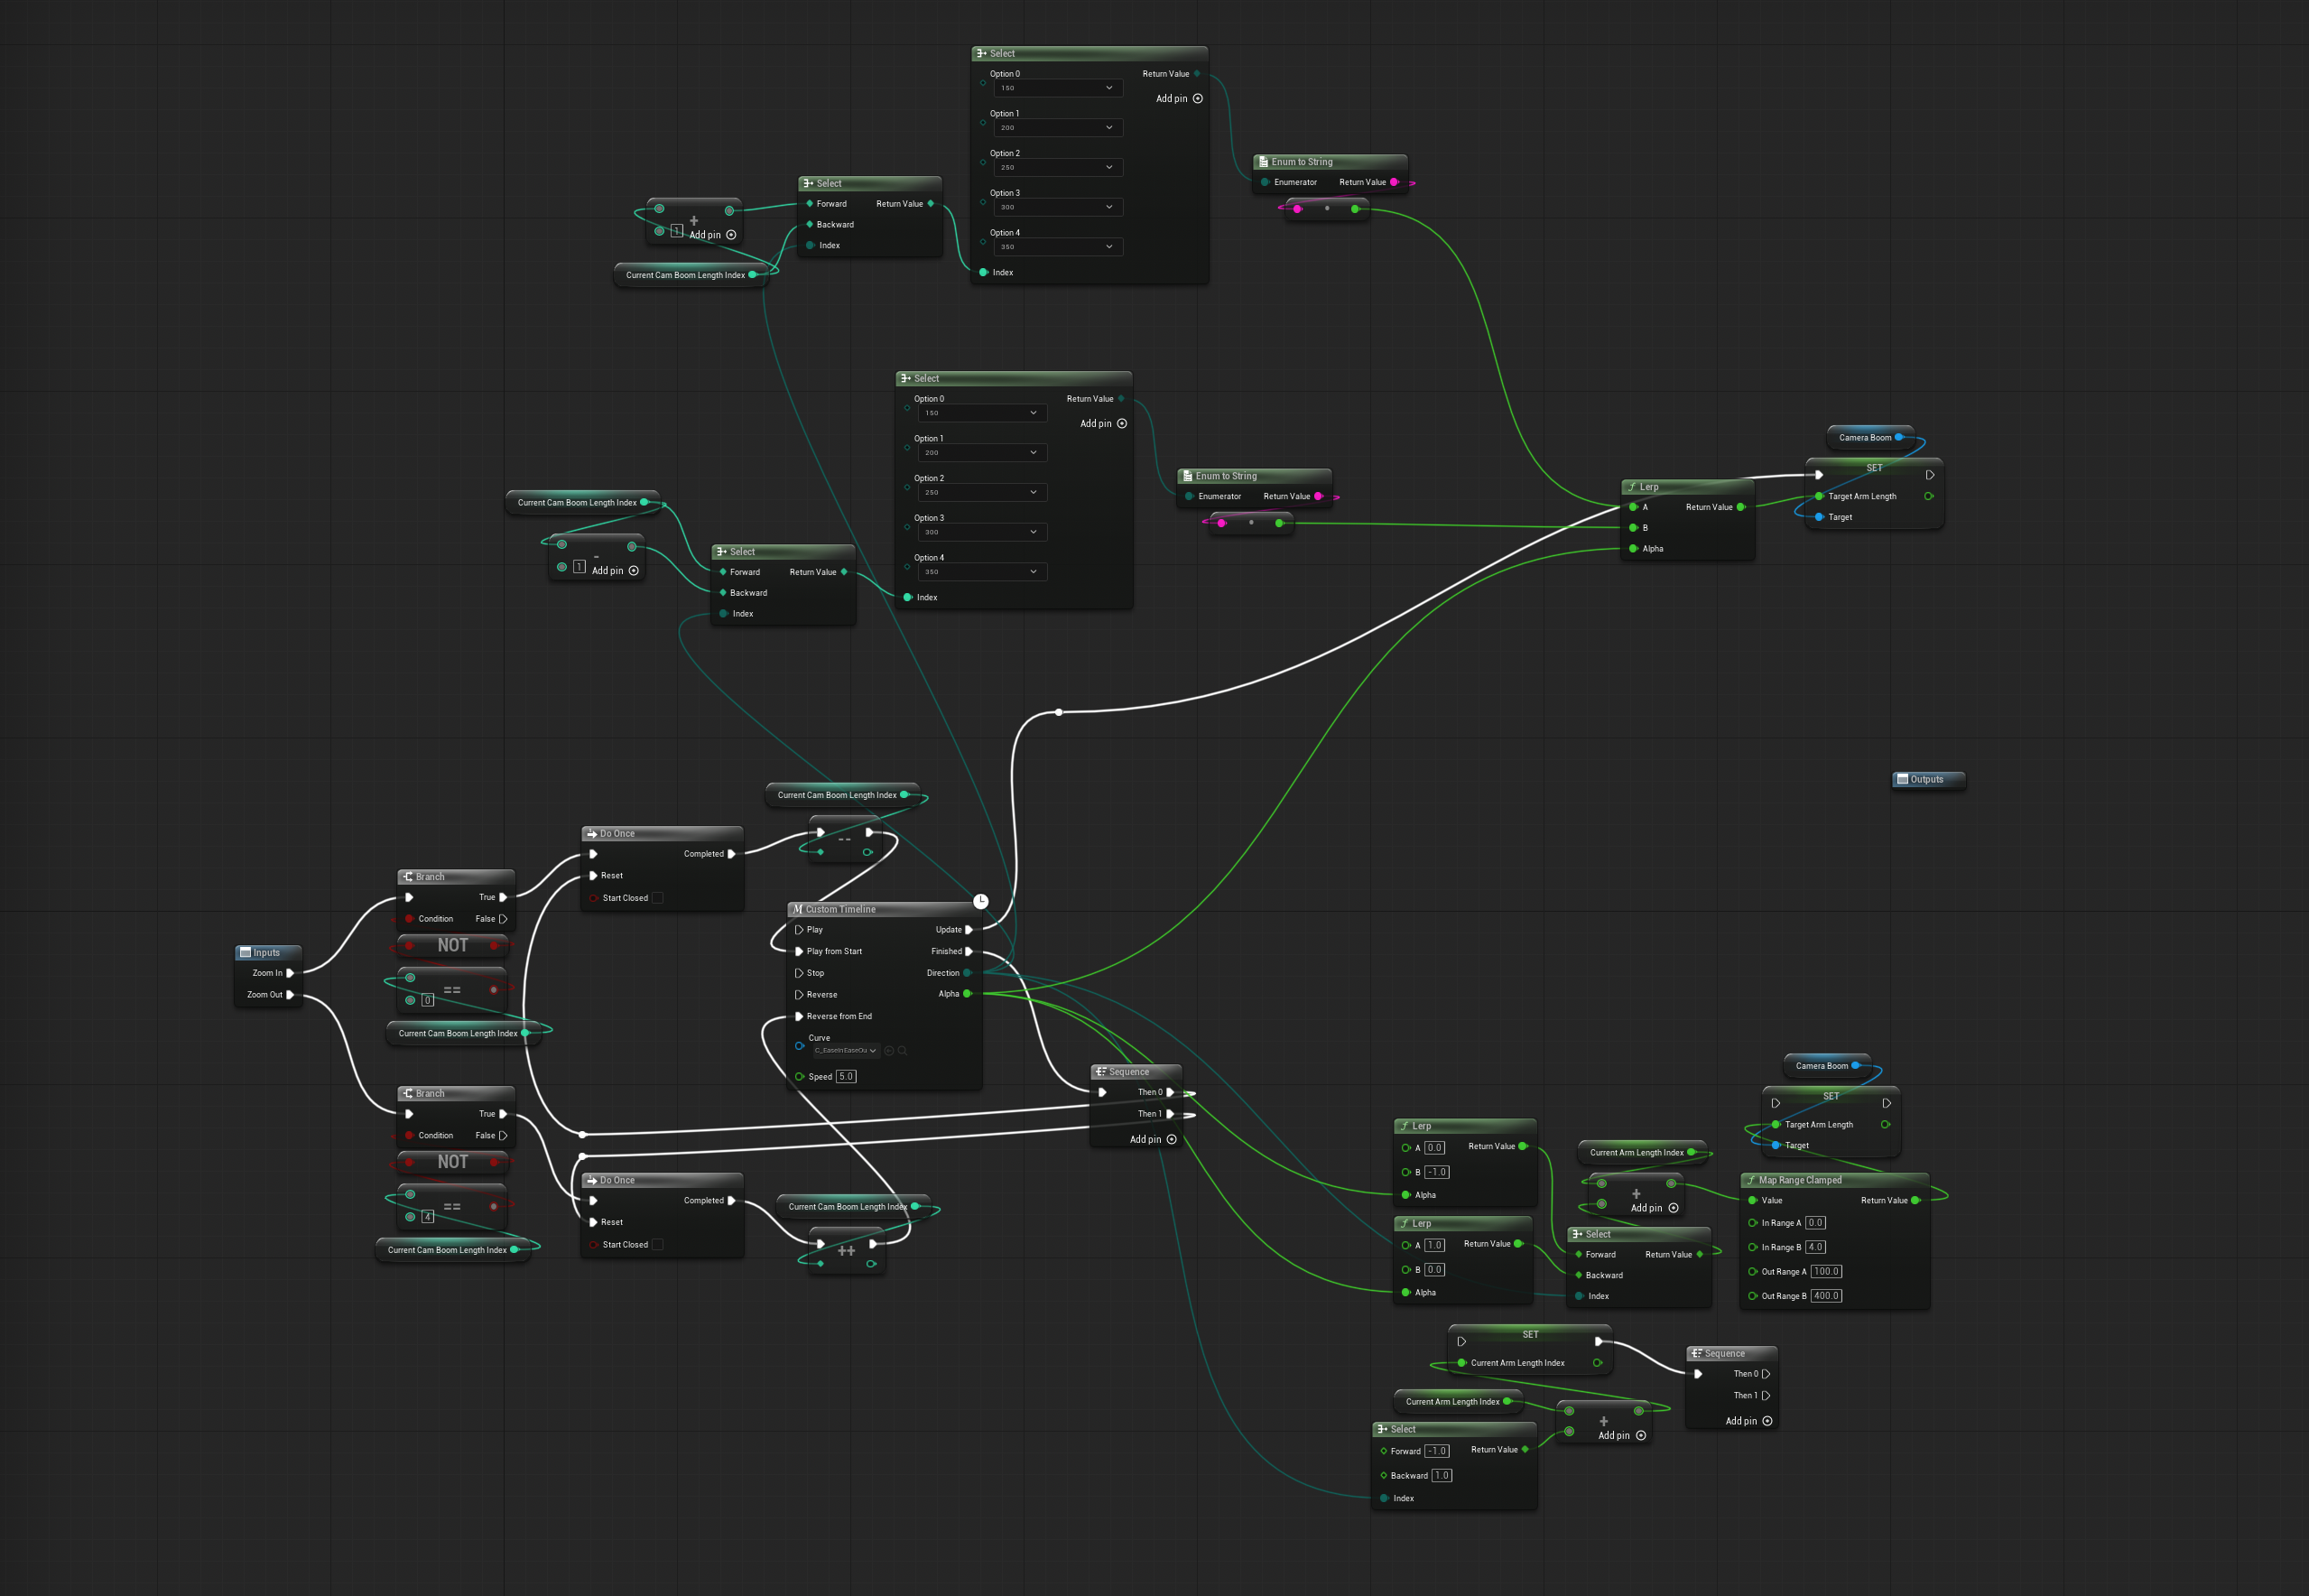
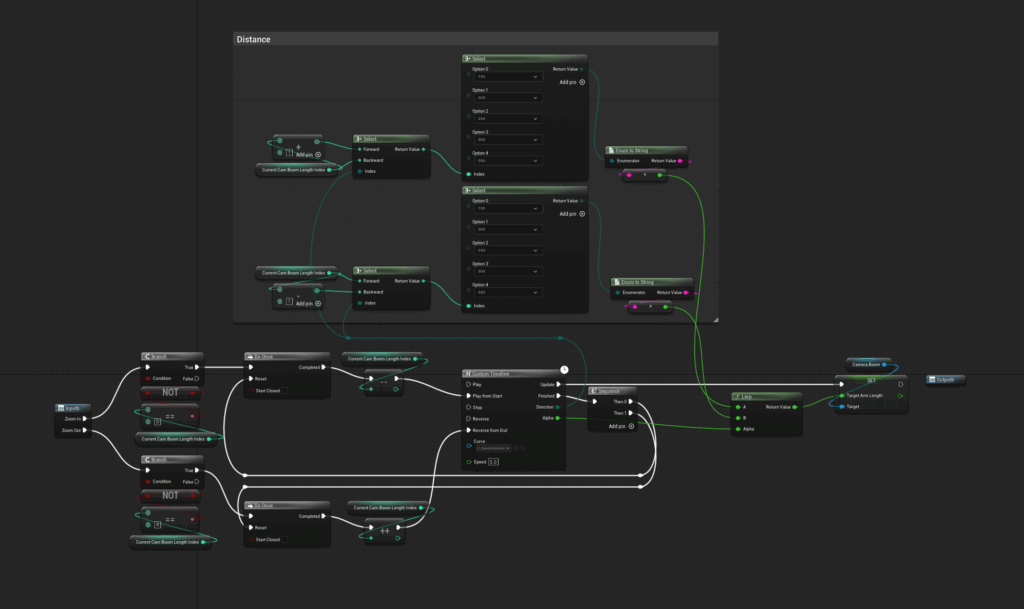
●A Major Collision Overhaul
Settings like collision profiles were part of it, but the main focus of this overhaul was camera collision.
It had been on my to-do list for a long time, but I kept ignoring it because it sounded like a hassle.
Eventually, the pressure became too persistent to ignore, like a little bear relentlessly poking me in the side, so I finally committed to it.
As many of you probably know, UE5’s default camera collision can feel very jittery, and it is not comfortable to play with.
In a game like Hotch Potch House, where tight spaces are packed with objects, it becomes especially stressful.
Up until now, I used a setup like the one in this video, two Spring Arms plus camera lag to keep the movement smooth, and I was fairly happy with it. But at a certain point, a number of issues started to show up.
The new logic was introduced to get rid of those problems.
What I referenced was the camera system in Hogwarts Legacy.
Moving closer works normally, but when the camera pulls back, it only moves slowly while the character or the camera is actually moving.
It is hard to explain in words, so here is what I built.
…It might still be hard to tell from the video.
But once you play it, it becomes obvious.
I also redesigned the behavior for when the camera overlaps with objects.
For example, if a thin object like a pencil blocks the camera, the camera can end up snapping back and forth rapidly, which ruins the experience.
One option is to make the camera ignore thin or small objects, but then the camera can sink into geometry, which also looks bad.
To solve this, I brought back this video.
By coincidence, it is a developer talk from the Hogwarts Legacy team. It is an excellent talk that I have been referring to since early development, but the part about camera collision had always remained a mystery to me.
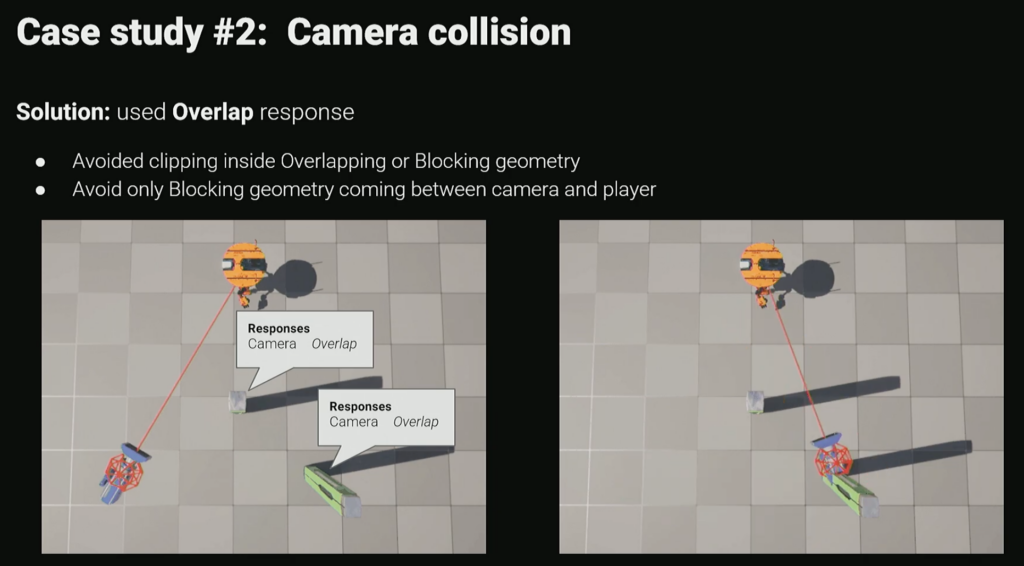
It says, “Solution: use overlap response,” but simply switching to overlap still lets the camera go inside thin objects.
The video does not explain the exact logic, so I had to build it myself.
Here is what I ended up with.
So yes, this is how I rewrote the camera behavior, and it was a pretty intense task.
The logic itself is fairly simple, but debugging was difficult because it runs every frame.
At one point, even though the math should have been correct, the camera was somehow drifting slightly away from where it should be. That was the biggest time sink.
The culprit turned out to be the Spring Arm’s Socket Offset, and I promptly removed it.
After that, everything moved forward smoothly.
●Shared Rig
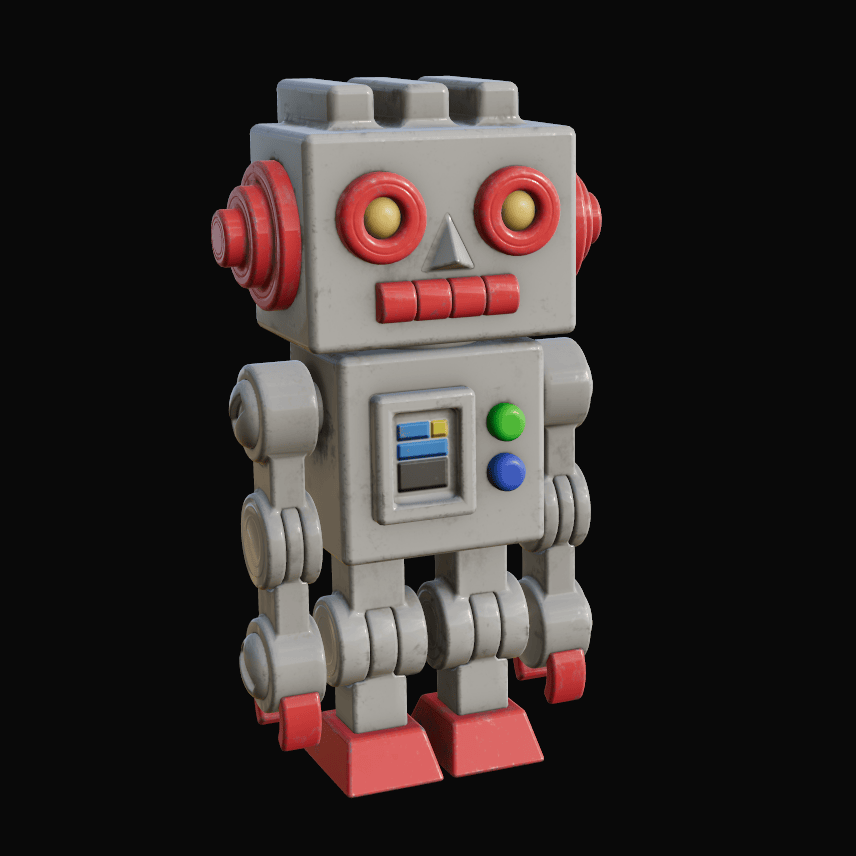
I made a robot NPC.
It already existed in the project, but it was originally a placeholder NPC and did not look great, so I rebuilt it.
…That said, it still does not look quite right, so I will probably end up revising it again.
While rebuilding the robot, I also revisited the rig setup.
Actually, that was the main point.
I grouped my characters into four categories, 1) humanoid, 2) quadruped, 3) bird, and 4) unique, and made each category share a common rig.
I think this is the standard approach in many game projects, but early in HPH’s development I was estimating roughly ten characters, so I planned to just make a unique rig for each one.
As development went on, my ambitions kept growing, and before I knew it, I was building twenty characters.
And it looks like the number may still go up.
At that point, giving every character a unique rig would make Animation Blueprint setup far too tedious.
Also, with twenty characters, I can probably reuse animations here and there.
That is why I decided to restructure the rigs.
First up is the humanoid rig, which I will use for the robot.
Building from scratch is a pain, so I use Rigify.
Rigify is an official Blender add-on, and it is my favorite rig preset.
The downside was that, because of its structure, exporting to UE5 would bring along a ton of extra bones I did not need.
I looked into ways around that and found an excellent add-on called GameRig.
With it, you can generate a game-ready rig that includes only the necessary bones, in a single click. Great.
By the way, the author of the add-on, Armin Halac, sounded familiar. It turns out he is the author of a well-known book on Blender rigging.
I almost never buy 3D books, YouTube is usually enough, but this is the one exception I bought, and it was genuinely helpful. Recommended.
From here, I will be building the other rig types one by one.
●MegaPlants
MegaPlants was added in 5.7.
Despite being an experimental feature, and on Mac, which is about the worst possible combination in UE5, it is surprisingly well-behaved, with almost no critical bugs.
How this relates to Hotch Potch House is that I mainly want to use it for the tree in the garden.
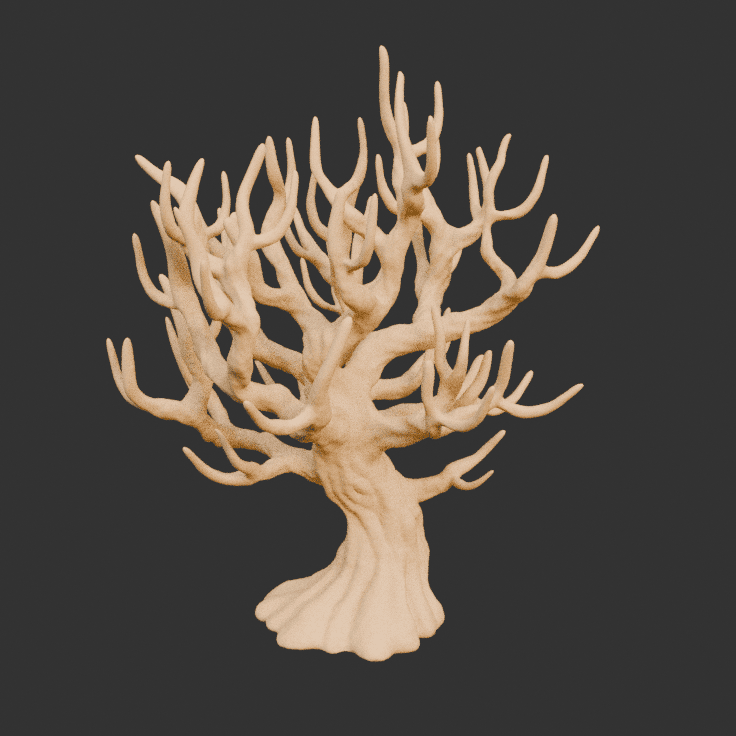
A while ago, I had already finished the base tree model.
All that was left was to place branches using PCG, but I was stuck on what to do about wind.
WPO is an option, but it is heavy on performance, and more importantly, the lighting does not look great, which was a problem.
Then this new feature showed up at the perfect time.
Exactly what I needed.
If I remake the branch and leaf parts so the style matches, I think I can build some really nice trees.
The one risky part is that I would need to update UE.
At the very least, it will not move into beta until 5.8, and going through two major version updates at this stage feels pretty scary.
Of course, I will test everything and move forward carefully, but I really want to make it work and bring it into the project.
●そのほか
So, about the Epic MegaGrants results that were announced last December…
I did not get selected🥲
I even dreamed about being accepted like four times. Something is not adding up.
This time I was fairly confident, so I took a proper look at what went wrong.
Here is my reflection report. Reflect, reflect.
【Reflection 1: I am not sharing information about myself】
This was a blind spot, but it is probably a very important point.
From the perspective of the person giving out money, there is always the risk that someone could take the money and disappear.
If they do not know who you are, they cannot really trust you.
I do share my real name and a photo of my face, but these days you can even generate profile images with AI *sigh.
For the next submission, I plan to include more information about myself.
【Reflection 2: I am not communicating the fun well enough】
Of course, I also thought about flaws in the game itself.
The biggest issue is… well… it is not fun.
From my perspective, it felt like a very exciting game, but when I tried to play it more objectively, it was basically just a model house tour where there is almost nothing to do.
In my head, I can clearly imagine a lot of fun elements, and I think that imagination was doing most of the work.
From now on, packing in genuinely fun gameplay will be one of my top priorities.
【Reflection 3: Amateur-level materials】
Belatedly, I researched how to make materials for publishers.
What I learned is that the materials I have submitted so far were not professional at all.
I also got a much clearer sense of what publishers actually want to see, so I am currently working on a new set of materials.
I plan to share them publicly at some point.
That is it for the reflections.
With that in mind, let us look at what is coming next.
●Future Plans
Based on my reflections on the MegaGrants result, my short-term plan has changed significantly.
My top priority is now to build a playable demo that includes genuinely fun, game-like elements.
I will improve things like boss battles and quests, and shape the demo into something that has a clear beginning and end, even if it is short.
At the same time, I will also keep working on the pitch materials in parallel.
So that was my first combined issue. It took me quite a while to write, but I am glad I managed to publish it.
Thank you for reading, and see you in the next issue.
Hotch Potch House Blog: Nov, 2025

This month was a particularly busy one with work.
Despite that, I was able to complete one enemy character as planned, and I also finished creating an additional NPC that I had not originally expected to make.
On top of that, I managed to use small gaps of free time to organize the folder structure and optimize lighting.
As a result, it turned out to be a far more productive month than I had anticipated.
●Piggy Bank
In the begging of the month, I managed to secure a bit of uninterrupted time, so I focused on working on an NPC.
As you can see, it is a piggy bank.
When I was a child, I had one that was bluish green. I wonder where he ended up.
Partway through modeling, it started to feel less cute than I wanted, so I adjusted the eyes at the very end.
But why is he breathing so heavily? You will only find out by playing the game:i
The image below is a kind of concept art.
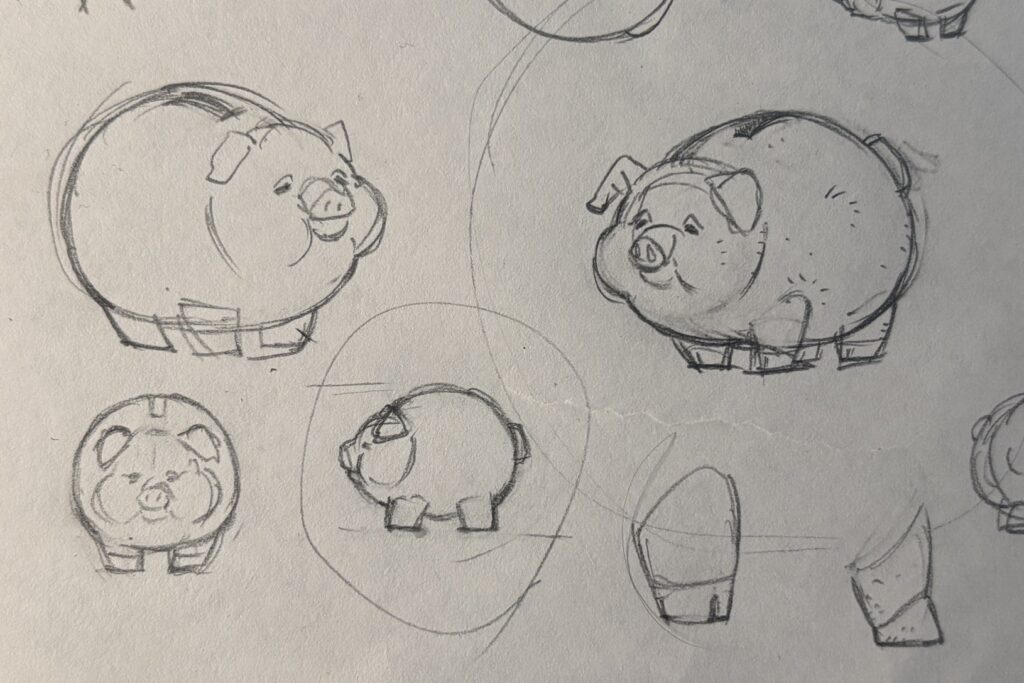
I did not realize this when I was drawing the concept art, but while working on the material, a thought suddenly occurred to me.
Since it is made of ceramic, would not such thin ears break easily?
So I broke them.
This time, unlike last month’s Kaiju, I created the rig from scratch.
Given the simple shape, I felt that existing setups like Auto Rig Pro or Rigify would be unnecessarily complex.
Even though I say “from scratch,” the setup is very simple, with deformation bones directly serving as control bones, so it did not take much time.
For weight painting, since Blender has reached version 5.0, I decided to try the built in painting tools.
I was honestly surprised at how much they have improved compared to what I remembered.
The last time I really used them was around 2.8, so that should not be too surprising.
In my previous blog post, I strongly recommended Handy Weight Paint add-on, but going forward, I think my reliance on it will likely decrease.
●Lighting Optimization
Lighting has a very strong impact on performance, so it needs to be carefully optimized.
Of course, with MegaLights, you can place lights with almost no restrictions.
Unfortunately, on macOS this is only supported from 5.7 onward, so it is not available to me.
All the features I actually need were already in 5.6, so I do not plan to upgrade to 5.7.
With that in mind, I moved on to optimizing the lighting setup.
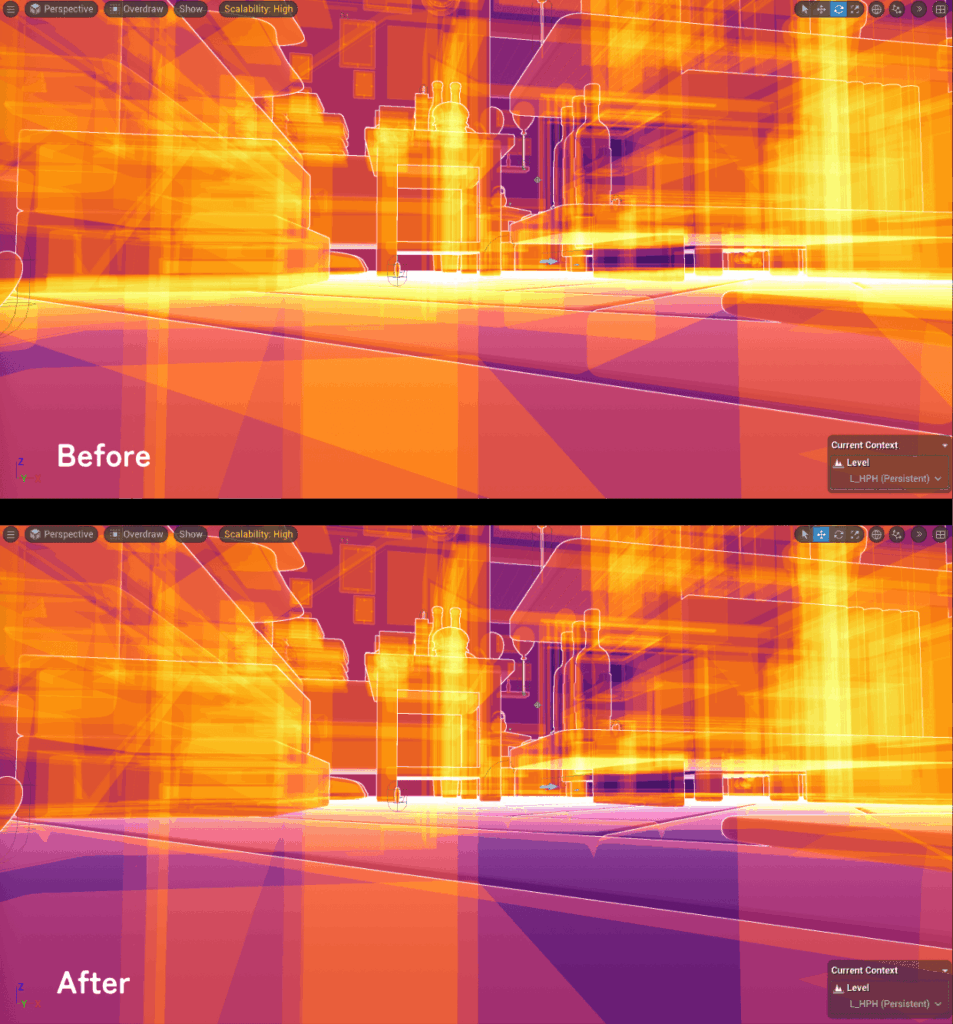
First, I enabled View → Optimization Viewmodes → Light Complexity to identify performance heavy areas.
This visualizes lighting cost using colors.
The red areas indicate the problematic parts.
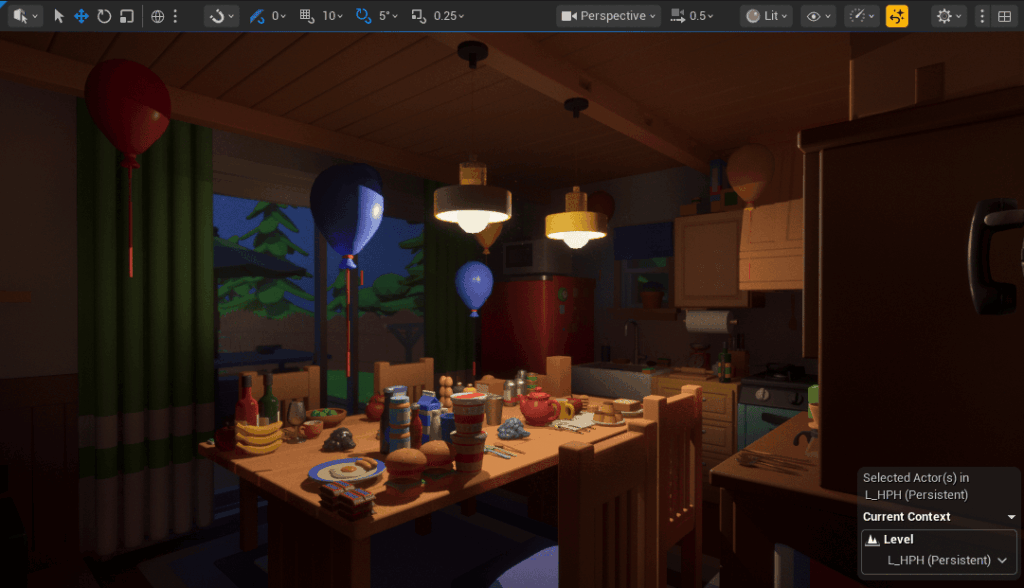
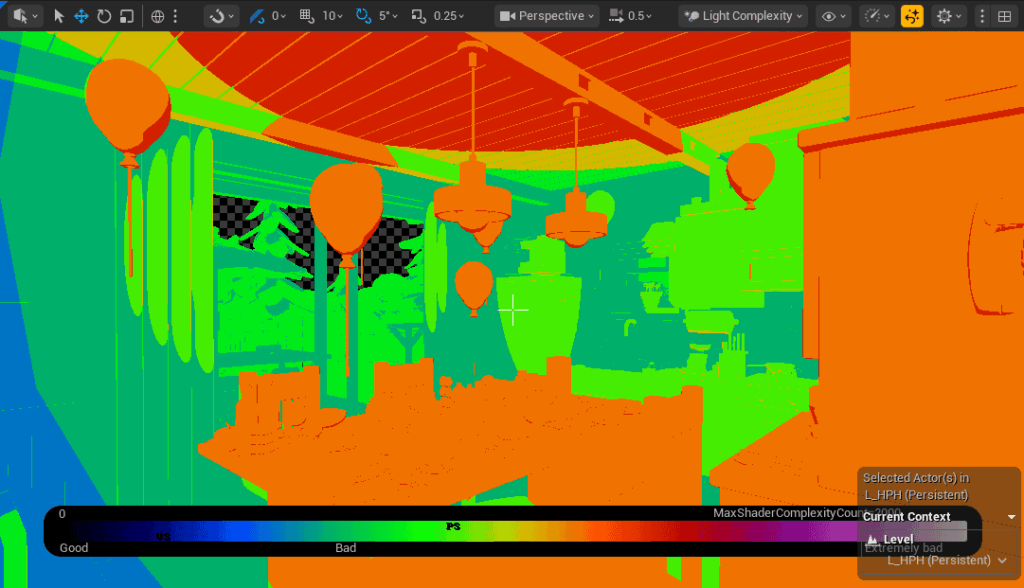
In this case, the cause was very easy to identify: point lights.
Point lights emit light uniformly in all directions, so even areas like the ceiling, which are not actually being lit, are still considered part of the light’s influence range.
As a result, they incur unnecessary performance cost.
So, simply replacing them with spot lights gives us the following result.
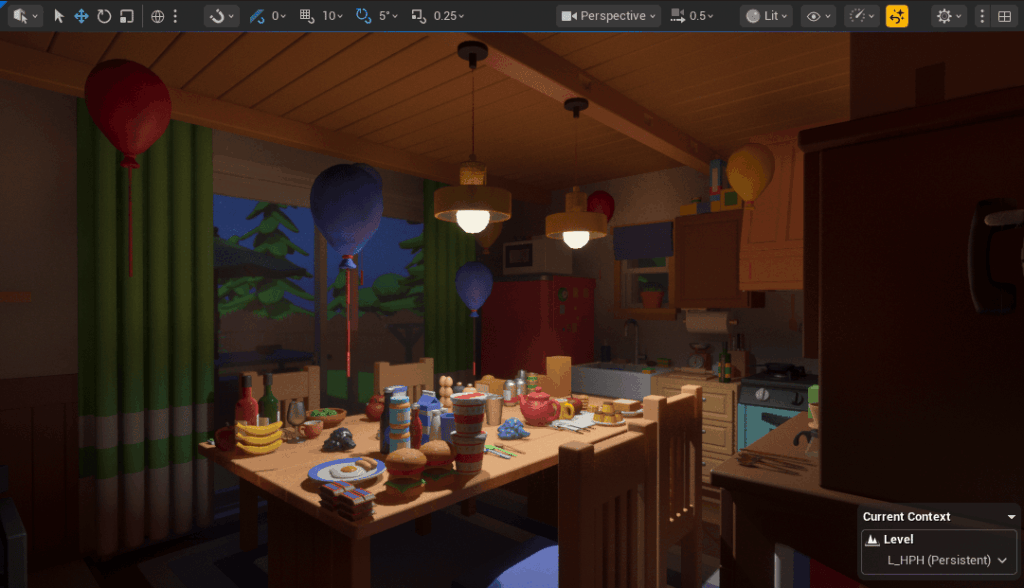
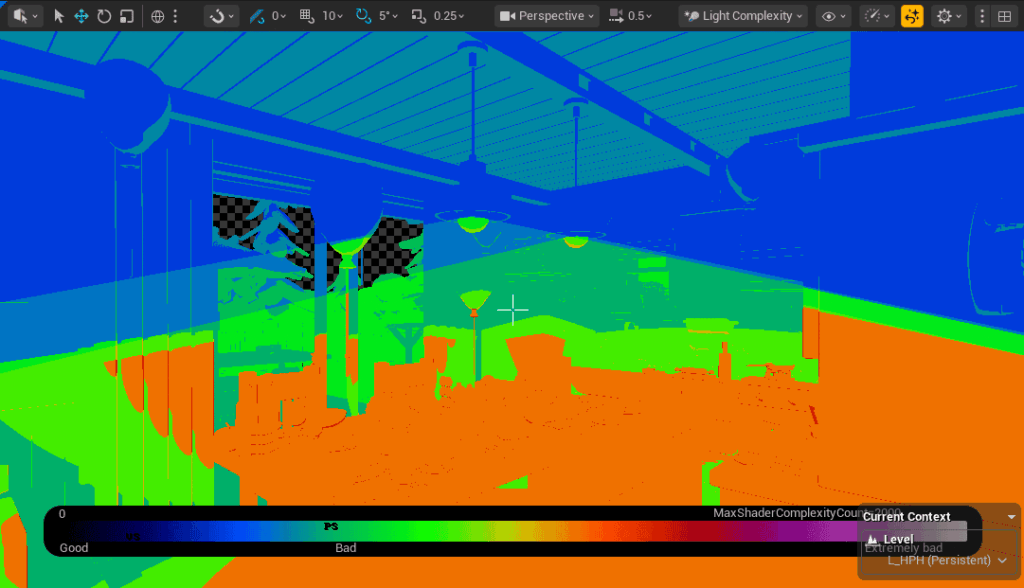
Both the visuals and performance improved.
Using this approach, I replaced every light that could safely be converted to a spot light.
For reference, lighting performance generally ranks as follows, from best to worst: spot lights, rect lights, then point lights.
This makes intuitive sense, since it directly corresponds to how wide an area each light affects.
Lastly, here is a comparison image of the final look.


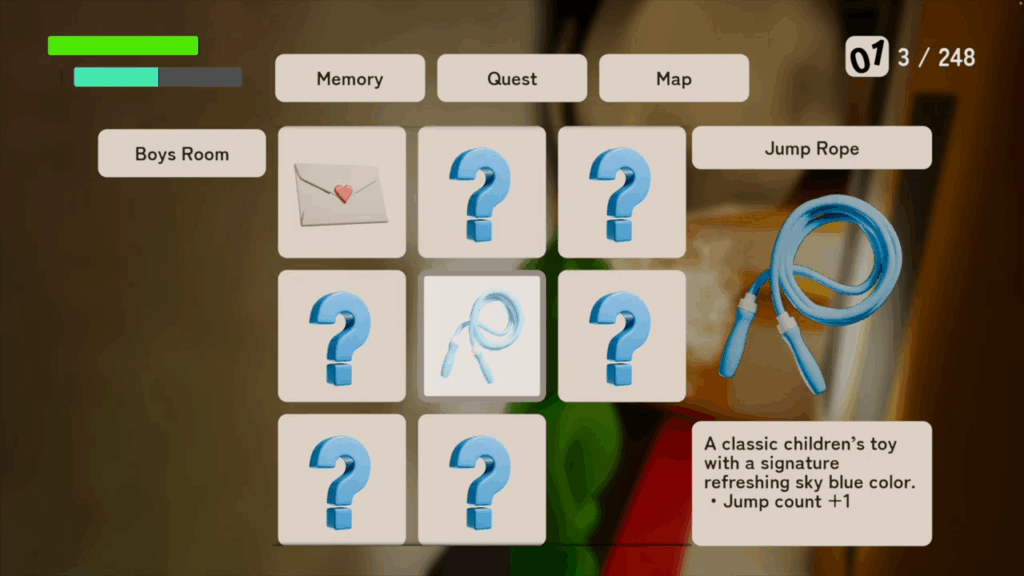
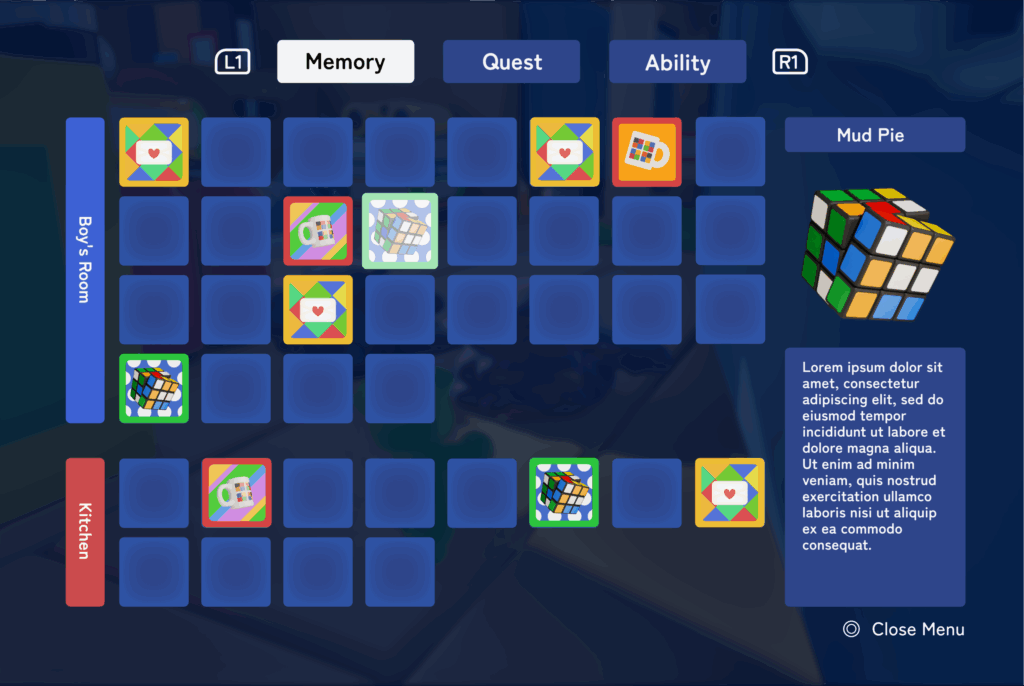
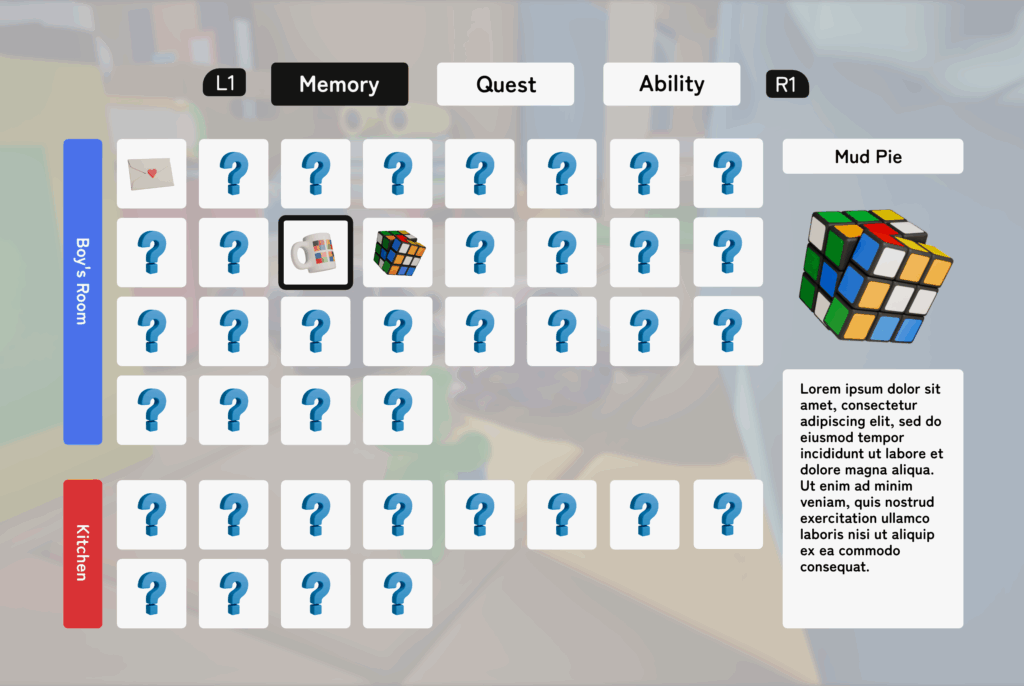
●Improving Memory Popup
I made some improvements to the memory popup.
Up until now, the UI filled the entire screen, creating a kind of heavy presentation.
With this update, it has become much lighter and cleaner.
Hmm.
The previous version might actually have been better.
I think I will experiment a bit more.
●Folder Structure Overhaul
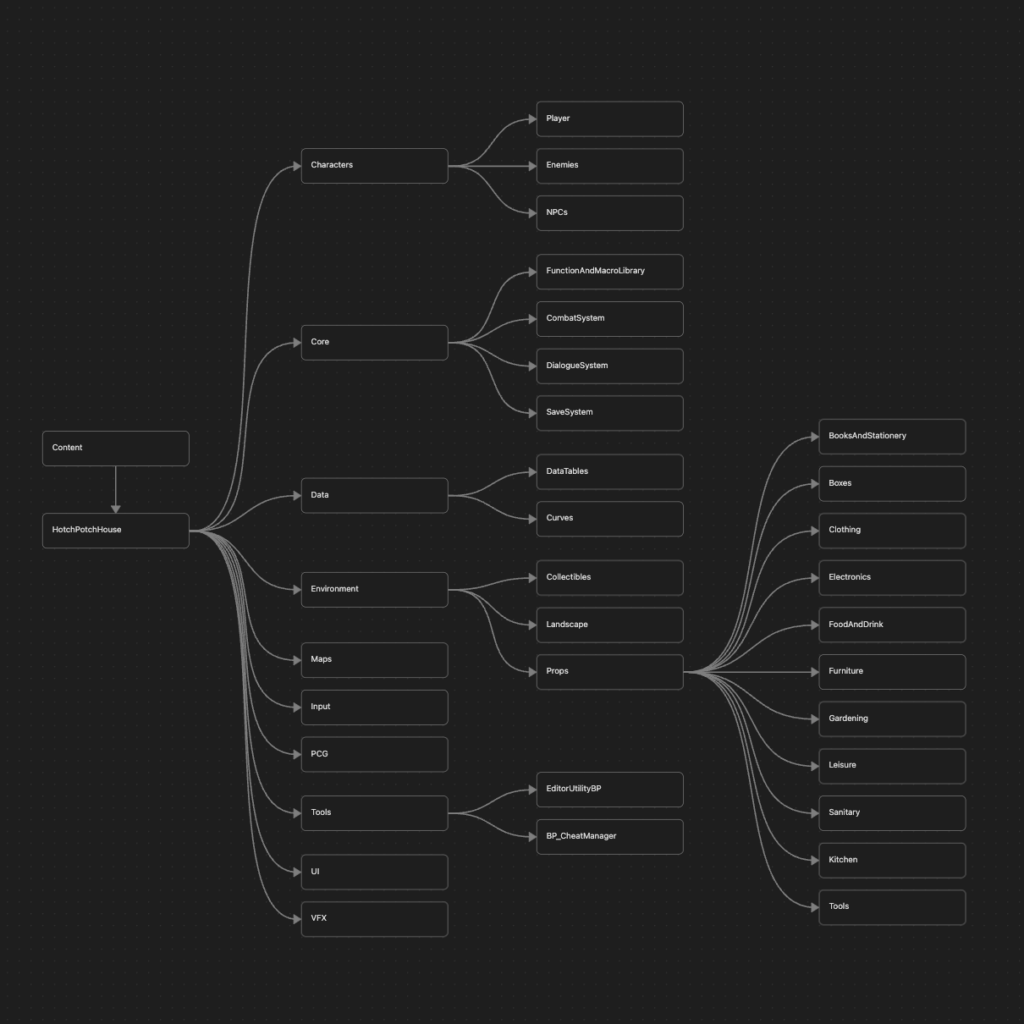
I carried out what will likely be the final major overhaul of the folder structure.
Until now, things had been packed in rather loosely, so I reorganized everything to properly match the game logic.
The most helpful reference by far was the well known Allar’s guide.
What makes this guide especially valuable is that it clearly explains the reasoning behind each organizational rule.
Even better, those reasons are genuinely convincing.
The point that stood out to me the most was the rule of creating a project named folder, in my case “HotchPotchHouse”, directly under the Content folder, and then placing folders like Characters and Maps beneath it.
When I first saw this, I thought, why go through such unnecessary trouble?
But after reading the explanation, it made complete sense.
The idea is to prevent existing assets from being overwritten when migrating assets from another project.
If you migrate assets and their dependencies come along with them, and one of those dependencies happens to have the same name as an existing asset, that quickly becomes a headache.
Going forward, I plan to adopt this structure.
Using Allar’s guide as a foundation, I adapted the categorization to fit HPH specifically, and eventually arrived at the structure shown below. Not every folder is visible, but the overall layout should be clear.
While not directly related to the folder structure itself, I also worked in parallel on replacing event based communication in Manager Blueprints with BPIs.
Previously, and this is slightly embarrassing to admit, the project was full of circular dependencies. For example, the Dialogue Manager and Quest Manager referenced each other directly and called events back and forth.
With this change, they now communicate without referencing each other at all.
As a result, even if one of them is replaced with a different Blueprint, everything still works correctly.
It also means that when migrating things to another project, unnecessary dependencies will not come along for the ride.
Ideally, this is something that should be decided early in development.
However, at the beginning I was simply hammering away at the keyboard without much thought, so concerns like this never crossed my mind.
That changed while working on other projects, where it occurred to me that using BPIs to improve modularity would be a better approach, and I decided to commit to it.
There may be opportunities to reuse this in other projects, and who knows, there might even be a sequel to HPH someday.
●Others
While updating HPH’s folder structure, I also took the opportunity to reorganize my Finder folders at the same time. This makes the third time in my life that I have done this.
Ever since I discovered the “Keep Downloaded” option in iCloud, I had wanted to migrate everything, and now things look much cleaner. Up until now, I had been managing all Unreal Engine projects and 3D assets in local folders, but at last everything is fully cloud managed.
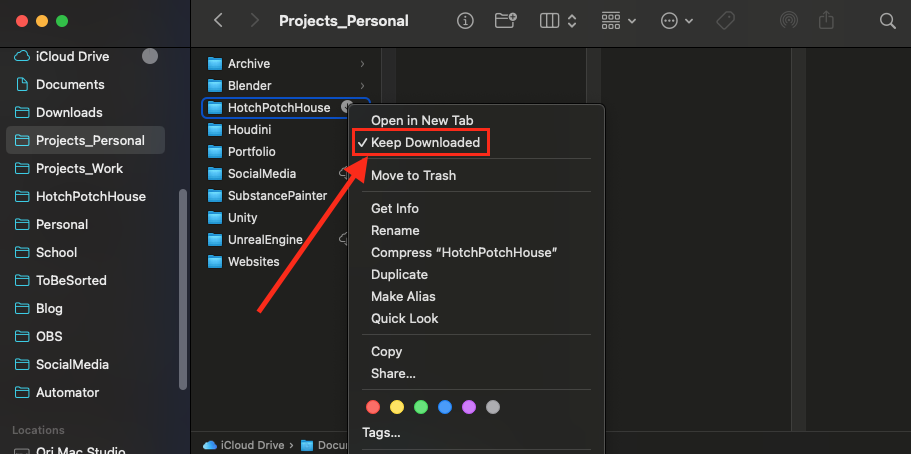
I also configured some application settings so they can be shared across devices.
To do this, I used symbolic links.
On macOS, these cannot be created through the GUI, so you need to use the Terminal.
It is such a useful feature that I cannot help but wonder why Apple has not integrated it into the normal interface so that even people who are not deeply interested in computers can use it.

In any case, this means I no longer have to manually copy settings data to another Mac every time I tweak something.
As a side note, Substance Painter does not recognize symbolic links, so unfortunately its settings still have to be managed separately on each device.
●Future Plans
I mentioned at the beginning that I created a new enemy character, but I decided not to show it this time.
The reason is simple. Without its actual gameplay logic, the character is not interesting at all.
I could have worked on the logic as well, but there is something more important that needs to be done first.
That is migrating the entire AI logic to State Tree.
So in December, I will officially start the transition to State Tree (Finally!).
The core logic itself has already been developed in a separate project file, so the task will be to adapt it to fit HPH.
I have a feeling that various issues will come up along the way, but it should be manageable.
According to the yearly plan, December also includes creating two NPCs.
This time, I am planning to work on humanoid characters, which are quite rare in HPH, so I am really looking forward to it.
These will probably not be shared to avoid spoilers, though.
Or maybe they will. Not sure yet.
And speaking of December, there is one thing I absolutely cannot forget.
The results of the Epic MegaGrants will be announced.
They are scheduled to be released sometime between December 1 and December 5, so the announcement is very soon.
I will share the results on social media and in the December blog post.
Please look forward to it.
By the way, the Add to Wishlist button below does not look very good, does it?
It also breaks on mobile.
I would really like to improve it within December. I’d also like images on the site to open in a popup when clicked.
I can finish that next month, too.
Hotch Potch House Blog: Oct, 2025

The development goals for this month (creating the system menu and main menu) have been successfully completed.
And since they were finished earlier than expected, it turned out to be a very productive month in which I also managed to work on things like NPCs, capture fixes, and several other tasks.
●NPC
Let’s start with the NPC monster.
I made a short timelapse showing the modeling process, so here it is:
The workflow was: modeling in Blender → texturing in Substance Painter → rigging in Blender.
Both the modeling and retopology were done using only standard features.
I may switch to Retopo Flow later, but for now I’m keeping it on hold.
Speaking of which, I recently saw news about an AI that can handle retopology at a practical level.
Most people hate retopo, but I actually kind of enjoy it, so it feels a bit bittersweet.
Of course, I could keep doing it manually, but that would make me the “slow worker”…
Looks like I’ll be saying goodbye to retopo soon.
For rigging, I used Auto Rig Pro.
It adds a few unnecessary bones, so it’s not ideal performance-wise, but building a rig from scratch would take too much time, so it’s a trade-off.
After all, there are over 20 NPCs planned, so efficiency is crucial.
For weight painting, I used Handy Weight Edit.
Personally, it’s an essential add-on. I can’t do weight painting without it anymore.


This is the reference 2D sketch.
Normally, I would finish it with colors and details, but this time I already had a fairly clear image in my head, so I just stopped at the thumbnail stage.
Whenever I skip the detailed planning like this, I always end up fumbling later.
To all sculptors out there, make sure to plan everything thoroughly before jumping into 3D sculpting!
●Main Menu
I created a mockup for the main menu.
When designing UI, I always start by checking how other games handle theirs, using the popular site among game developers.
Main menus tend to look quite similar across titles, so for HPH, I wanted something that stands out at first glance.
And here’s the mockup I came up with!
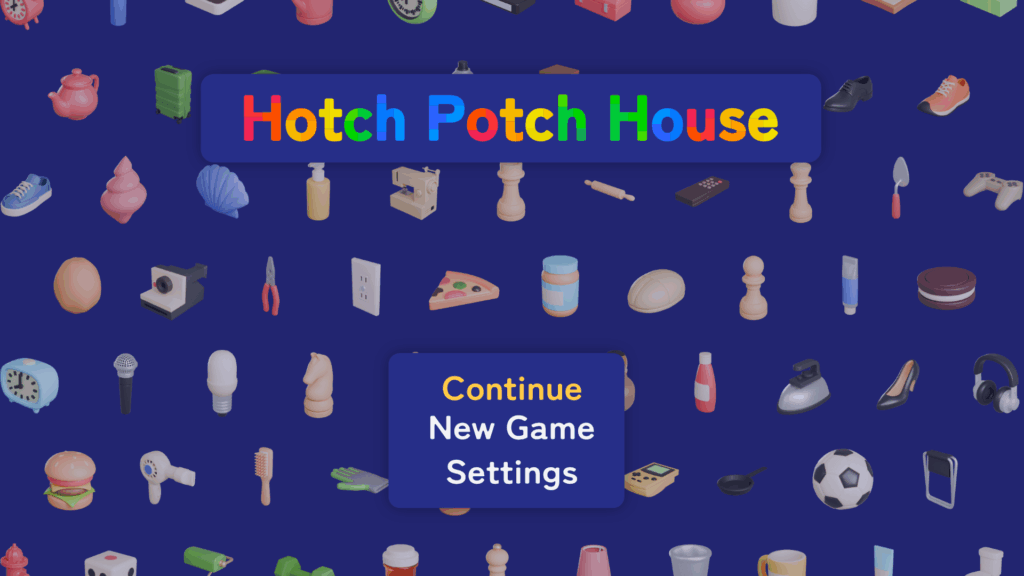
…
Well… I suppose this is fine for a first attempt.
For now, I decided to go with a design-oriented direction.
But on second thought: “Wait a second. If the atmosphere is the most important thing of HPH, shouldn’t the menu reflect that?”
And that led to the second version!
The images will, of course, be replaced later, but the layout and overall direction feel right.
I’ll probably stick with this.
…In the end, it ended up looking similar to other games anyway.
By the way, the large set of icons used in the first draft were automatically rendered in Blender with a custom batch-rendering set up I made.
I thought they’d go unused after the redesign, but they ended up being repurposed as the background for the system menu.
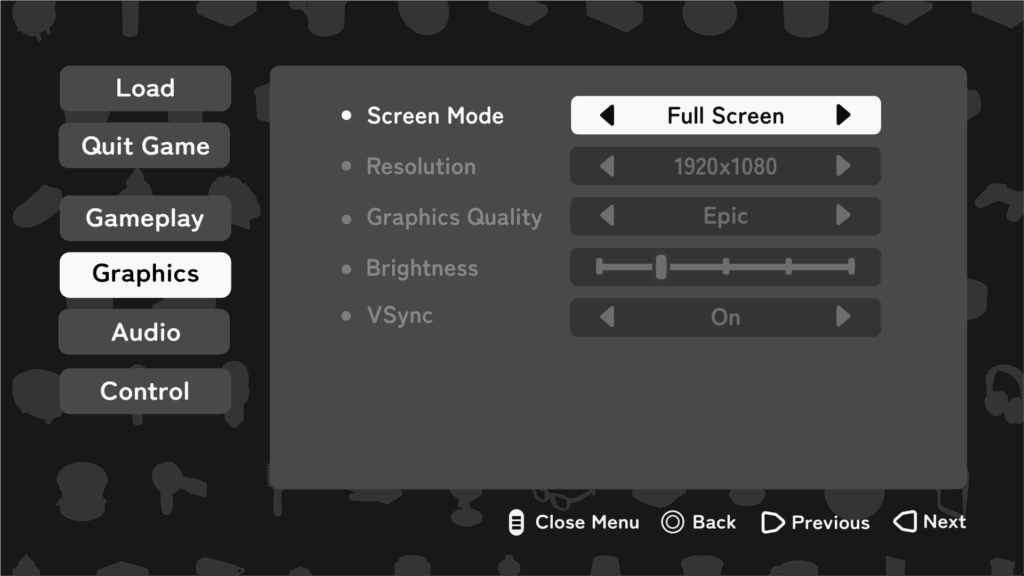
●System Menu
And this is it!
Not bad at all.
So far, only the brightness adjustment is functional, but when it comes to the settings menu, the difficult part is just the UI creation.
After that, it’s incredibly simple since all that remains is using the built-in Unreal Engine nodes like “Set Screen Resolution” or “Set VSync Enabled.”
It’s almost just a matter of dropping them in.
One element I personally like in this menu is the input guide placed at the bottom (“Close Menu,” “Change Value,” etc.).
These icons automatically switch depending on the type of controller being used (PC, PS, Switch 2, and so on).
There’s the same feature in the Common UI plugin called Common Action Widget, but its downside is that you can’t customize the button style.
Since I wanted to use different button styles between the game menu and the system menu, I decided to build my own from scratch.
Here’s the game menu, by the way.
You can see that the button style displayed at the bottom differs from the one used in the system menu:
Of course, I also made a mockup for the system menu before starting full production.
●Hang on Ledge
I made major adjustments to the climbing logic and animation.
In fact, the previous version wasn’t functioning at all, so this was essentially a full rebuild.
The key improvements are that the character now follows curved surfaces and that the travel distance can be adjusted based on how much the analogue stick is tilted.
For the Root Motion, I used the Motion Warping plugin to make it dynamic.
Actually, I always use this plugin whenever Root Motion is involved.
It’s far more flexible to modify things directly through Blueprints than to bake everything into the animation.
As for performance, there’s been almost no noticeable impact so far.
By the way, the code looks much cleaner now too.

●Level Design
I recently discovered a powerful plugin called MeshPack, which prompted me to rethink my level design workflow again.
The plugin gathers all Static Mesh, ISM, and HISM actors in each level at build time, and merges identical meshes into instances of a single ISM.
There is a common argument that ISM is unnecessary when you have Nanite, but CPU cost from a large number of actors still exists even with Nanite. So there is still a clear benefit to instancing.
In short, this plugin can deliver significant performance gains.
There are downsides.
Any asset that contains logic, including Construction Script, is excluded.
That means all my carefully built “placement” Blueprints are out of scope.
Do I minimize Blueprint usage to maximize MeshPack’s effect?
Or do I keep my placement workflow and accept the overhead of placing and adjusting actors by hand?
Should I write a custom placement Editor Utility Widget instead?
These thoughts keep bouncing around in my head.
If this were an ordinary plugin, I might pass.
However, the author, Tore Lervik, is an engine contributor and the developer of MeshBlend, which is also excellent.
That gives me confidence.
Support is solid as well. I asked on Discord about Blueprint compatibility and got a reply the same day.
Given all that, I have been genuinely torn.
Update before posting: I decided to proceed with a hybrid approach🎉
●Others
On October 30, the Affinity suite was unified into a single application and made available for free.
Before the announcement, most people were expecting something negative, but once it was revealed, it turned out to be surprisingly positive.
Personally, I’m very happy about it, having unified functionality and UI across the suite is a big improvement.
However, looking at the YouTube comments under the announcement video, it seems many users didn’t take it as positively.
Some are convinced that Canva (,which owns Affinity) will eventually switch to a subscription model.
I’m not so sure about that.
I actually trust Canva quite a bit.
Watching interviews with the CEO, I get a similar impression to Bluesky’s Jay Graber, someone who gives you the sense that “as long as this person is in charge, things will be fine.”
(That said I’m all for Mastodon when it comes to social media.)
So for now, I plan to keep using Affinity.
Oh right, I canceled my Adobe subscription just last month…
●Next Plans
By the way, don’t you think this month’s blog came out unusually early and feels more substantial than usual?
Up until this blog, I had been starting to write near the end of each month, like a fifth grader scrambling to finish their summer homework the night before school starts.
But this time, I actually began around the 15th, full of determination.
Still late?
Fair point. I’ll do my best.
That said, November will probably be quite busy with work, so I might not have much time for extra progress.
Maybe there’s no need to start writing too early after all.
According to the yearly plan, finishing even one enemy character this month would already be good enough.
Still, writing a blog post about just one NPC wouldn’t make for much of an update.
So I’ll drink a red bull (no I won’t) and make sure there’s enough progress for one solid post.
Which means, in the end, I’ll probably need to start writing early again after all.
Anyway, I’ll stop here for now and get started on next month’s post. See you then:)
Hotch Potch House Blog: Sep, 2025
September was mainly about lighting, audio, and other work to enhance immersion.
In Hotch Potch House (HPH), atmosphere is one of the most important elements, so I gave it extra attention this month.
Also, since the deadline for the Epic MegaGrants application was approaching, a lot of fine-tuning went into the project.
●Lighting
The highlight of this month was lighting.
I had left it untouched for a while, but with the MegaGrants application coming up, I revisited and refined it.
Here’s what it currently looks like ↓ The god rays are looking great. The image quality is bad only because of WordPress compression.
By tweaking the parameters in Ultra Dynamic Sky, I’ve gotten much closer to my ideal look.
One major issue remains: the day–night transition still isn’t smooth.
Since settings like Exposure differ greatly between day and night, switching abruptly causes the screen to suddenly become blindingly bright or pitch-dark.
In the video below, you can see a custom widget I made that lets me switch between the two setups while changing the time of day, but when it switches, the screen briefly turns completely white.
The same thing happens during gameplay, so I’ll need to fix that. Hopefully sometime in October.

●Sound Design
It often doesn’t get much attention, but I personally believe sound is extremely important in films and games.
There’s an animated film by Mamoru Oshii called The Sky Crawlers, and the sound design in it is really good. Almost like ASMR.
My favorite part is the coffee-making scene: they skip the animation entirely and express everything through sound alone.
Coffee aside, I plan to put a lot of effort into the audio for HPH as well.
High-quality sound assets are expensive, so for now I’m using placeholders that can easily be swapped later.
This month I worked on the garden’s ambient sound: birds chirping, trees rustling, that sort of thing.
It might seem easy to just loop a long ambient track, but players quickly notice the repetition, which breaks immersion.
To avoid that, I started using Soundscape, an official Epic plugin that randomly plays ambient sounds around the player’s position.
It’s a fantastic system. Easy to set up and usable within a couple of hours if you follow a good tutorial.
Also on the sound front, a friend of mine in the game industry has agreed to compose the music for HPH✨
It’ll likely make its debut in the trailer planned for January next year.
Stay tuned!
●Other Updates
①UI Assets
I made a bunch of new UI elements this month:


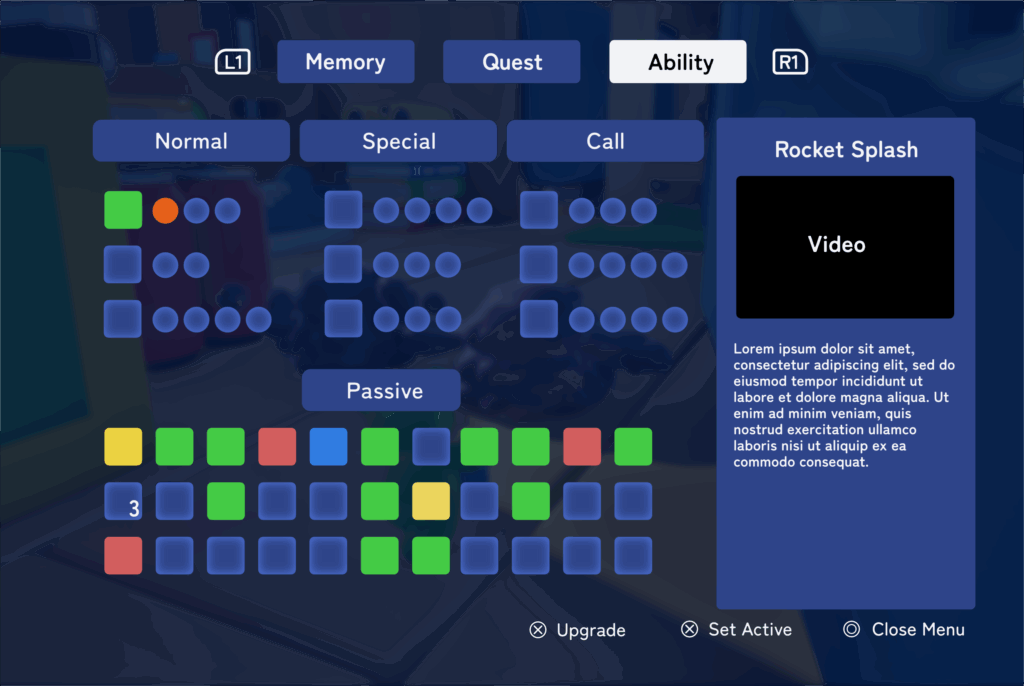
Ability icons..
PC button prompts…
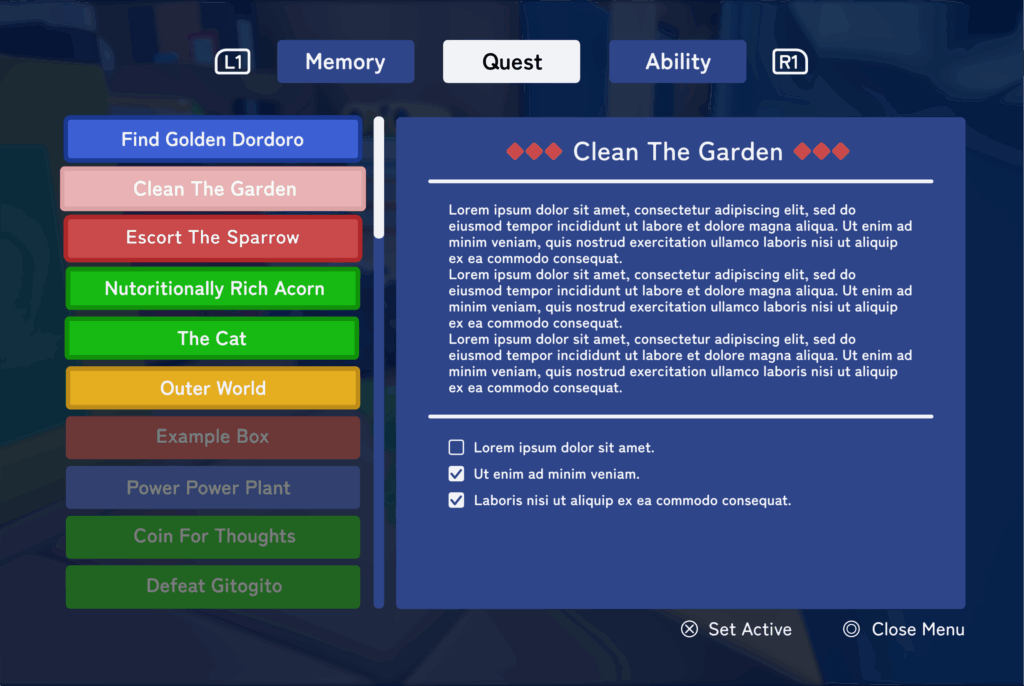
Quest UI checkboxes… and more.
②Level Design Reboot
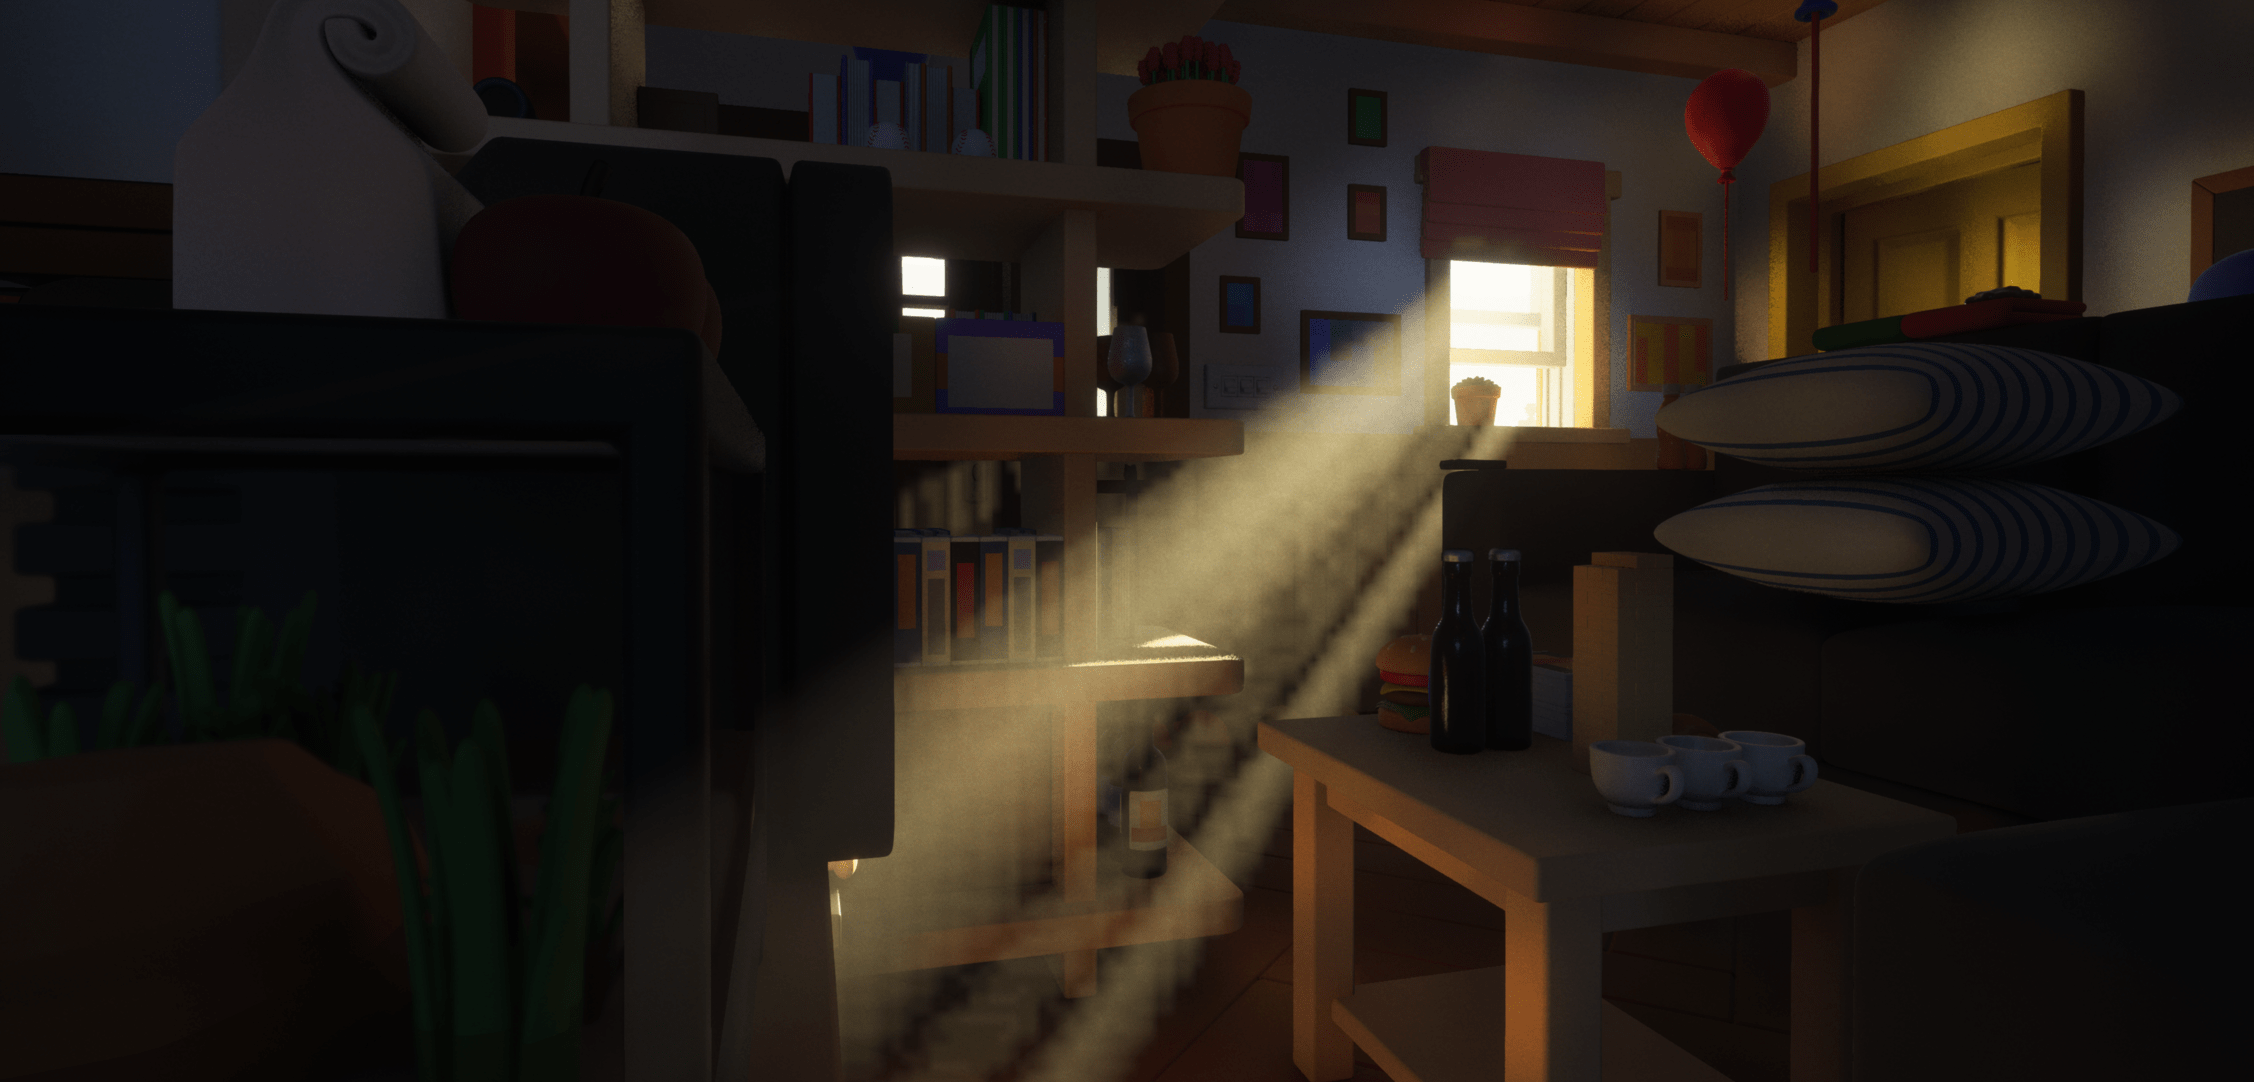
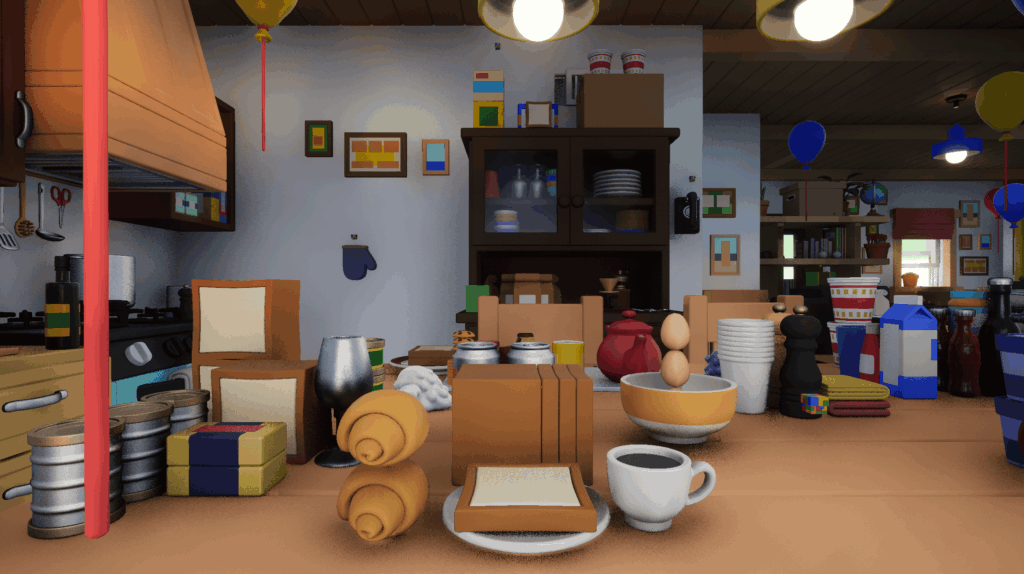
As seen in the image in the Lighting section, I’ve deleted most of the existing assets and started reworking the layout to match new features and quests.
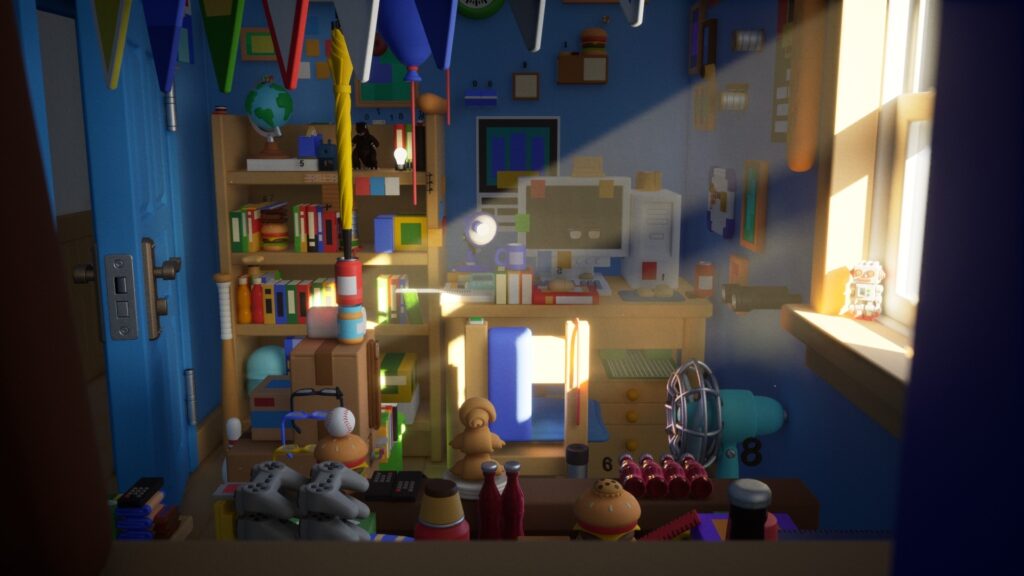
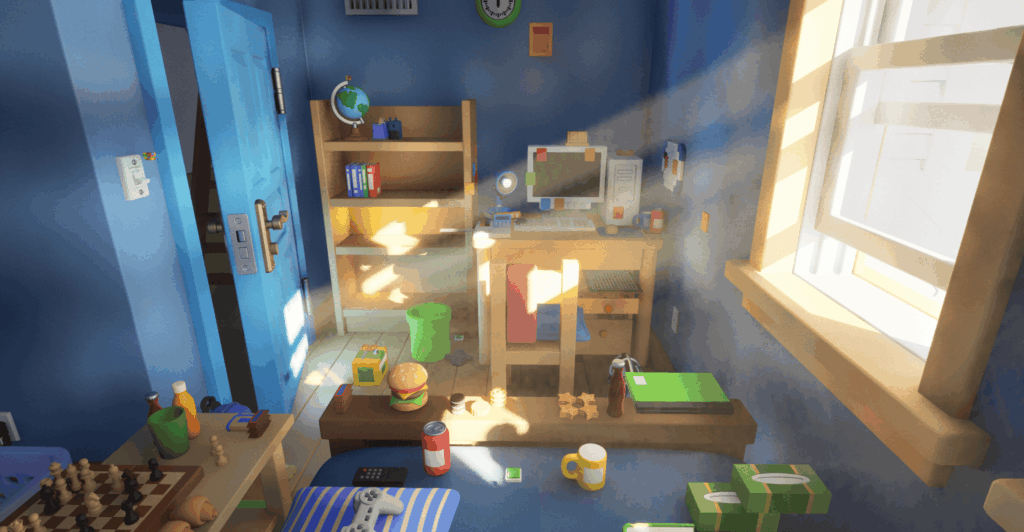
As a side note, I really love this screenshot. It feels like a room before moving out, which fits the nostalgic, transient atmosphere that HPH strives to capture.
③Cicada Shell
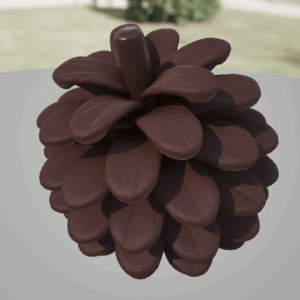
Since this month was mostly adjustments and bug fixes, I don’t have much new to show—so here’s Cicada Shell (Memory) instead.
Why are cicada shells so beautiful, though?
●What’s Next
Next month, I’ll be working on the main menu and settings screen.
NPC production will also begin in earnest, and I’m planning to make a time-lapse sculpting video for one of them—hopefully I can include it in the October update.
As for the Epic MegaGrants results, they’ll be announced in early December.
Regardless of the outcome, I’ll share the results on social media and in the January devlog.
If you’d like, please click the beautiful button below to visit the game’s Steam page and add it to your wishlist. It really keeps me motivated:)
See you next month!
Hotch Potch House Blog: Aug, 2025
●Level Design
At long last, full-fledged level design has begun!
Level design is the process of actually placing the 3D assets created by background artists and building up the world.
Before making a game, I thought, “Eh, you just plop down a bunch of 3D models, right?”
But once I tried doing it myself, I realized there’s a lot more to think about (though that’s true of most things in life).
For Hotch Potch House, the single most important thing is to make the world feel exciting, so everything revolves around that.
What’s waiting around the next corner? Is there a hidden passage tucked away here? It’s all about creating a sense of wonder.
On top of that, I have to make sure the experience is smooth and stress-free for players by, for example, not placing objects too tight so they don’t make the camera jitter, or clearly separating areas you can reach with a normal jump from those that require a high jump.
I also need to create tools for placement.
If I had to place each book mesh one by one to make a bookshelf, the sun would set before I finished—and performance would be terrible.
Whenever I need to line up lots of identical objects, I always use Instanced Static Meshes (ISM) to give the computer a break.
ISM is basically an efficient version of SM.
If for example I want to line up 150 copies of The Very Hungry Caterpillar, using SM would be like processing “Caterpillar + Caterpillar + Caterpillar + …”, but with ISM it’s just “Caterpillar ×150.”
Much kinder to the computer.
I built a bunch of tools like that and put together a short video of some highlights.
Though maybe it wasn’t quite worth making into a video… but anyway.
So how much progress have I actually made? As of late August, basically none!
Work’s been busy (excuses, excuses).
I’ll push harder in September.
●Area System
In games with large spaces, it’s common to split them into areas and load/unload them as needed to boost performance.
If the player can’t see an area, it’s not needed, so we unload it to lighten the computer’s load.
In Hotch Potch House, the world is divided room by room.
UE5 uses a feature called Level Streaming and there are a lot of handy tools for that, but the problem is that when you unload and then reload an area, it reverts to its original state.
That means treasure chests you opened re-close, enemies you defeated respawn, and so on.
To fix that, I pulled my old save system out of the closet and tuned it up to actually work.
Before making a game I thought, “Saving is a given, right? Easy peasy.” But once I tried making one myself, I realized it’s no time to be “easy peasying” around.
Save systems aren’t very fun to explain, so I’ll skip the details. Sorry, save system.
By the way, I teach UE5 at a vocational school, but since my classes are video-focused, I don’t have to worry about load/unload or save systems. That makes things much easier.
But of course, it’s exactly this kind of hassle that makes game development so much fun.
Anyway, with all these parts combined, the area system is basically finished. From the outside, currently the main visible difference is that the collectibles shown in the upper right change as you move between areas. I made a video showing how it looks.
Though maybe it wasn’t worth making into a video… but anyway.
●Boss Battle
Last month I was on the fence about switching to State Trees, but since updating to UE5.6 looks a little risky, I’ve decided to put it on hold.
As a result, the boss battle implementation is also postponed.
I’ll almost certainly switch to ST eventually, so if I build the boss fight in BT now it would just end up wasted effort.
I’ve already built out the ST logic in another project and it runs nicely. I think I managed to make it pretty lean, too.
Now it’s just a matter of waiting until UE reaches around 5.6.3 and stabilizes.
By the way, I complained on social media that UE5.6 performance on Mac wasn’t great, but on the school’s M4 Max MacBook it runs about the same speed as 5.5.
So maybe my M2 Max Studio is just starting to show its age… even though I’m still paying it off…
●Other Updates
The water effect is now getting very close to what I had in mind.
Just one or two more tweaks and it’ll be perfect.
Its evolution so far has been: 2D image → 2.5D → static 3D → dynamic 3D (VAT).
In Pokémon terms, it’s like a Charizard that’s just evolved from Charmeleon if that makes sense.
I’ve also been fixing little bugs in the dialogue and ability systems, and cleaning up code.
Tidying messy code is honestly one of my favorite tasks.
I turn a jumble of spaghetti into beautiful noodles, like in the images below.
While working on a video I realized it might not be worth making into a video, so I made images instead.
●Future Plans
The deadline for Epic Megagrants is only about three weeks away.
I absolutely need to deliver a playable build, so the first half of September will be mostly spent on small adjustments.
After submitting to Megagrants, I plan to create the main menu (New Game, Continue, Settings) and add more NPCs and enemies.
See you next month!
Hotch Potch House Blog: July, 2025
●Asset Completion
The creation of assets is (almost) finished!
When I counted them up, it turned out to be about 900 assets in total.
Since I already had around 300 completed by the time of the previous demo, that means I made roughly 600 additional ones.
That said, as I’ll explain below, more than half of the previously made assets also needed adjustments in addition to the newly created ones. So in practice, I’ve actually worked on even more than that.
Originally, these were supposed to be done ages ago (back in January 2025), but here we are, still working on them until now.
The reason for all the adjustments was the need to optimize for Nanite and Lumen.When I first started, I didn’t know much about these new features and was creating assets in the traditional way.
Over the past year, however, my knowledge has improved, and I began to clearly see the flaws in the older assets.
Maybe I could have left them as they were, but it bothered me so much I couldn’t sleep at night, so I decided to go through and fix everything.
Specifically, what I mainly worked is combining meshes into larger chunks to reduce overdraw for Nanite, and splitting meshes to avoid concave shapes that Lumen struggles with.
Here’s an example of Nanite optimization:

Normally, a small amount of overlap wouldn’t be a big problem.
But since HPH is a game with a huge amount of objects, the cumulative load per asset could drag down the framerate. So this turned out to be a fairly important task.
I also created custom collision meshes for everything.
Because most objects require precise traces for grabbing or movement, I couldn’t rely on auto-generation, so I built them all manually.
Thankfully, since the assets were all non-destructive, this wasn’t too bad.
In most cases, I could get a collision base mesh just by stripping away modifiers, geometry nodes, or materials, then adjust for whether the player should be able to hang on its edges or pass through it.

All the completed meshes and collisions were exported as USD and imported into Unreal Engine 5.
Normally when working with Blender you’d use FBX, but this time I wanted to have asset placement more or less finalized inside Blender.
So I chose USD, which lets me import multiple objects into UE5 while preserving their positions.
It’s a relatively new format, and the workflow isn’t fully established nor is UE5 perfectly compatible, so there were plenty of headaches along the way.
Anyway, now that the ingredients are in place, all that’s left is to place assets to match the quests and story.
Sounds simple, but there are mountains of things to think about.
I’ll talk about that next time (probably).
●VAT
VAT stands for Vertex Animation Texture.
It stores vertex transforms in a texture and plays them back as animation.
Since the vertices don’t actually move and everything is processed by the GPU via materials, you can make realistic effects with relatively low performance impact.
I started using Houdini to make these, and ended up spending about half of this month studying Houdini.
But thanks to that, I can now make more than just water (like fire, snow, etc.), and I found a lot of techniques I can apply to my hobby use of Geometry Nodes in Blender, so I’m pretty satisfied.
So far, I’ve created two effects, but eventually I plan to replace almost all liquid effects with VAT.
Optimization is still pending, but I intend to use Niagara Data Channels to instance each effect, making them lighter.
●State Tree
In 5.6, State Trees received a major update, and most of the critical bugs are gone.
Minor ones remain here and there, but it seems to have grown into something stable enough for practical use.
So I was in the middle of migrating completely from Behavior Trees to State Trees.
…or at least I was, until I discovered that 5.6 isn’t optimized for Metal (Mac’s rendering system), and performance drops by about -15fps.
So for now, I’ve put the update on hold.
And while I was writing this, 5.6.1 came out, but the issue still wasn’t fixed.
Hmm…
●Memories
I also kept making “Memories” assets this month.
Here are just a few examples:
I’ll keep quietly making more in the background.
I probably won’t show them on the blog anymore, but please just assume I’m still steadily working on them.
●What’s Next?
Time is running short with the Epic Megagrants deadline coming up in September.
So I’ll focus on level design and the boss battle.
I’ll also continue working on quests, which I’ve been neglecting due to spending so much time on Houdini studies.
And of course, lots of adjustments and bug fixing—which will probably take the most time.
But man, not being able to migrate to 5.6 is painful.
If I make the boss in BT, it’s almost guaranteed to be scrapped later.
Should I just gamble that the next patch will fix performance and go ahead with ST now? Hmmmm.
I’ll report back on how that went in the August update.
See you next month.
Hotch Potch Blog: Jun, 2025
●Blog Launched
This blog shares updates, behind-the-scenes insights, and future plans for Hotch Potch House.
I plan to update it monthly, so feel free to drop by when you have time.
Also find me on Mastodon, Bluesky, and X for more bite-sized updates.
So, let’s dive into the June 2025 progress!
●UI Overhaul
I revamped the UI. The original felt off, and I just needed to fix it fast—mission accomplished.
Here’s a quick comparison of the changes:
(I’m only showing mockups of new versions, but the actual implementation matches closely.)
UI overhaul had always been a top priority, but since UI design isn’t my area of expertise, I kept putting it off. This time, I finally made up my mind to tackle it—and as expected, it was a lot of work.
It was tough enough that I decided to make it the very first topic on my blog.
But if something is hard, that just means there’s room to grow. I learned a lot through the process.

So here’s how I approached it: I started by creating mockups in Affinity Designer to finalize the overall design.
The biggest decision was whether to go with a dark theme or a light theme. Initially, I was planning to use a light theme, but in the end, I chose dark to protect players’ eyes.
(I also changed the website to a dark theme. I’m planning to add a toggle feature in the future—stay tuned.)
Side note: Affinity Designer is great. It’s fast, responsive, and a one-time purchase. I’ve fully switched over from Illustrator.
Once the mockups were done, I created the actual UI elements in UE5 and laid them out. That part went smoothly.
What was tough was building the logic—especially for the ability menu.
…I tried explaining it in writing, but it’s hard to put into words. So let’s just say it was tough.
Aside from the technical parts, I think my obsession with writing clean code made things harder than they needed to be.
If the code isn’t tidy, I feel uneasy. Keeping things organized helps with debugging and adjustments, but maybe I overdid it a bit.
●Scheduling
I’d been meaning to revisit my schedule for the September Epic Mega Grants submission, but I kept putting it off…
But I finally sat down and did it.
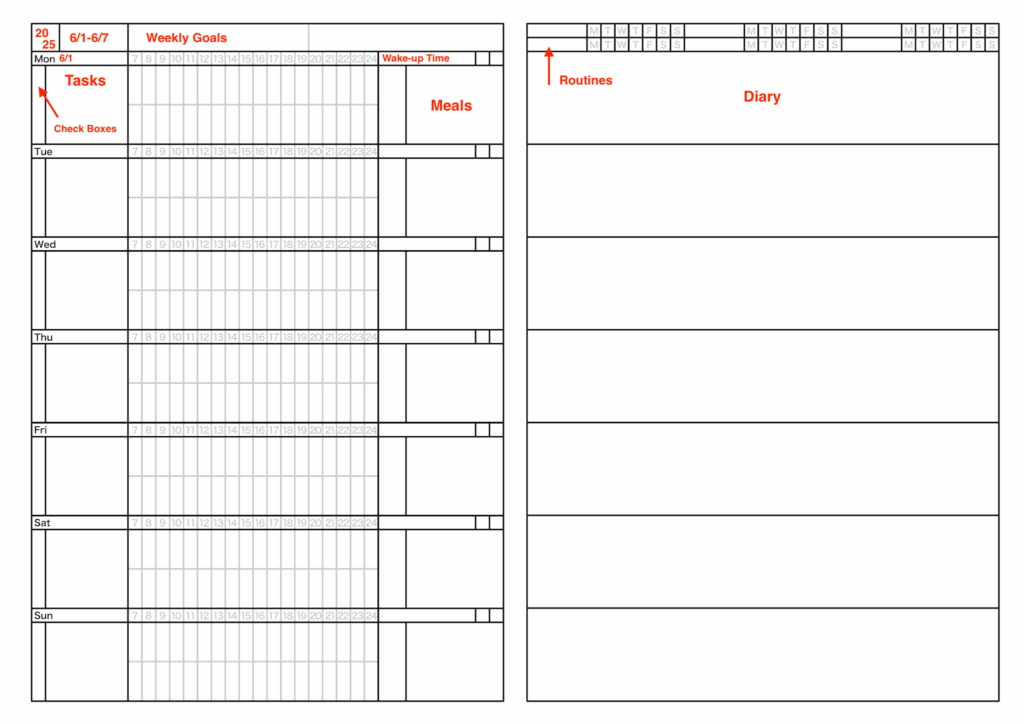
I started by listing my major goals in Obsidian, organized by category with checkboxes.
Then I broke them down into weekly and daily tasks and transferred everything to my custom planner.
Having everything laid out like this really helps: it shows me exactly what to do, keeps me motivated, and takes a load off my mind.
By the way, I built this planner myself a while ago, and I’ve stuck with it ever since.
Custom-made really is the best.
●New Ability
I added a new “Steam” ability. Adding another skill really livens things up—it makes the game feel much more like a real game.
I have plenty more abilities planned, but I’ll probably hold off on sharing them here to avoid spoilers. It’s a common dilemma in game development: you want to show off your progress, but revealing too much can ruin the fun. It reminds me of something a producer at Studio Ghibli once said about Avatar Way of Water: “If you watch all the trailers, you get the whole story, so there’s no reason to see the movie.” or something like that. Still, Avatar Way of Water turned out to be a huge success, so maybe spoilers don’t matter as much as we think.
What do I do🤔
●By the way…
Epic has released Unreal Engine 5.6! There are tons of great updates—MetaHuman, Movie Render Graph, and more—but personally, what excites me most is the major improvement to State Tree.
Finally, I feel like I can graduate from Behavior Trees. BTs have been around forever, and while they’re stable and usable, they’ve always felt cluttered to me.
In contrast, State Trees are so much cleaner. Don’t you think?
Once version 5.6.1 is out, I’m planning to migrate all my BT logic over to State Tree. I’m aiming to finish the migration in early August, so I’ll post an update here once that’s done.
●Rig and Animation Recreation
I rebuilt Tabi’s rig. It was a lot of work.
But the result is a more flexible and elegant rig than before. I also remade the animations to match the new rig, and while I was at it, I changed the framerate from 24fps to 60fps. Now it moves much more smoothly.
No demo video this time (Filming is kind of a hassle. Sorry), but it’ll be featured properly in the next gameplay video.

●Beautiful Memories
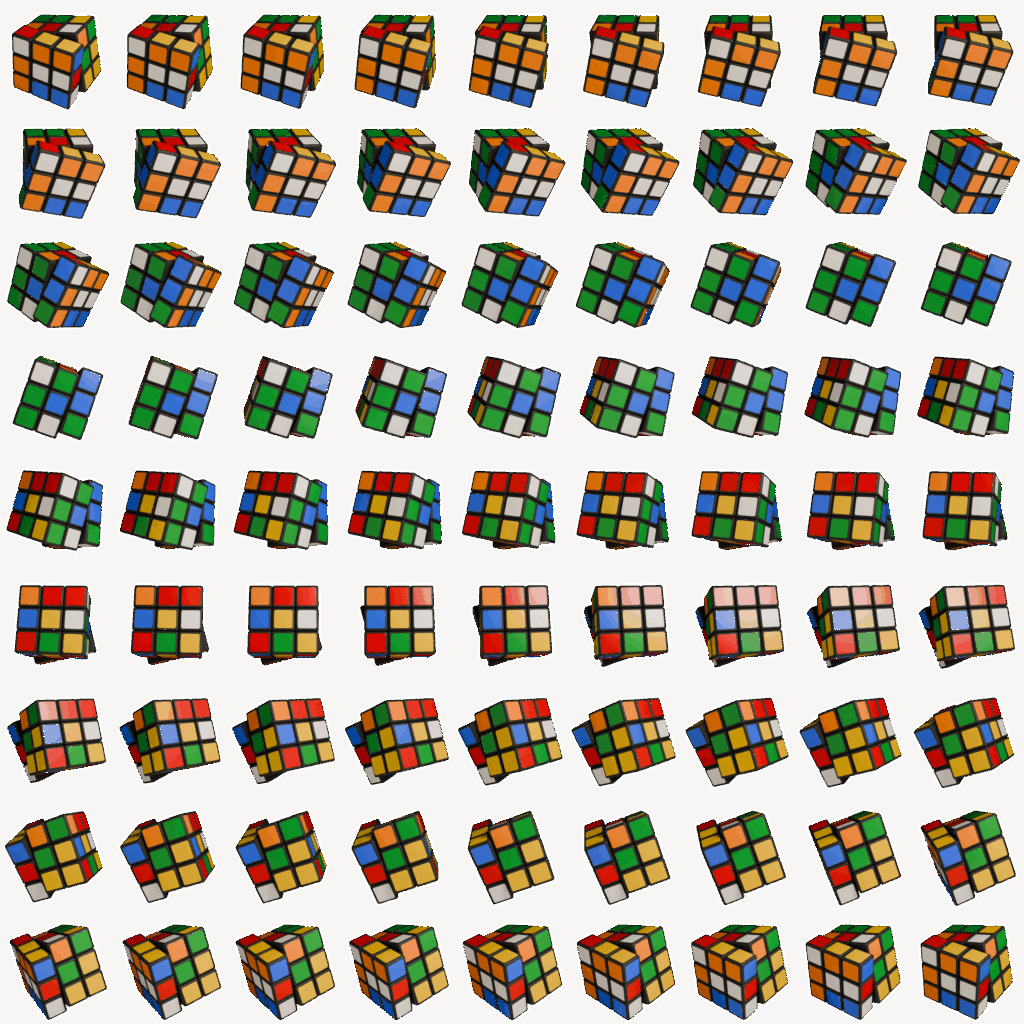
I’d been meaning to start working on the Memories system, but it was one of those things I kept putting off, mostly because the sheer number of items felt overwhelming.
I finally committed to making one per week, and now I’ve got six done.
The final goal is around 40, so at this pace, it’ll take about nine more months to complete. Still a long road ahead.
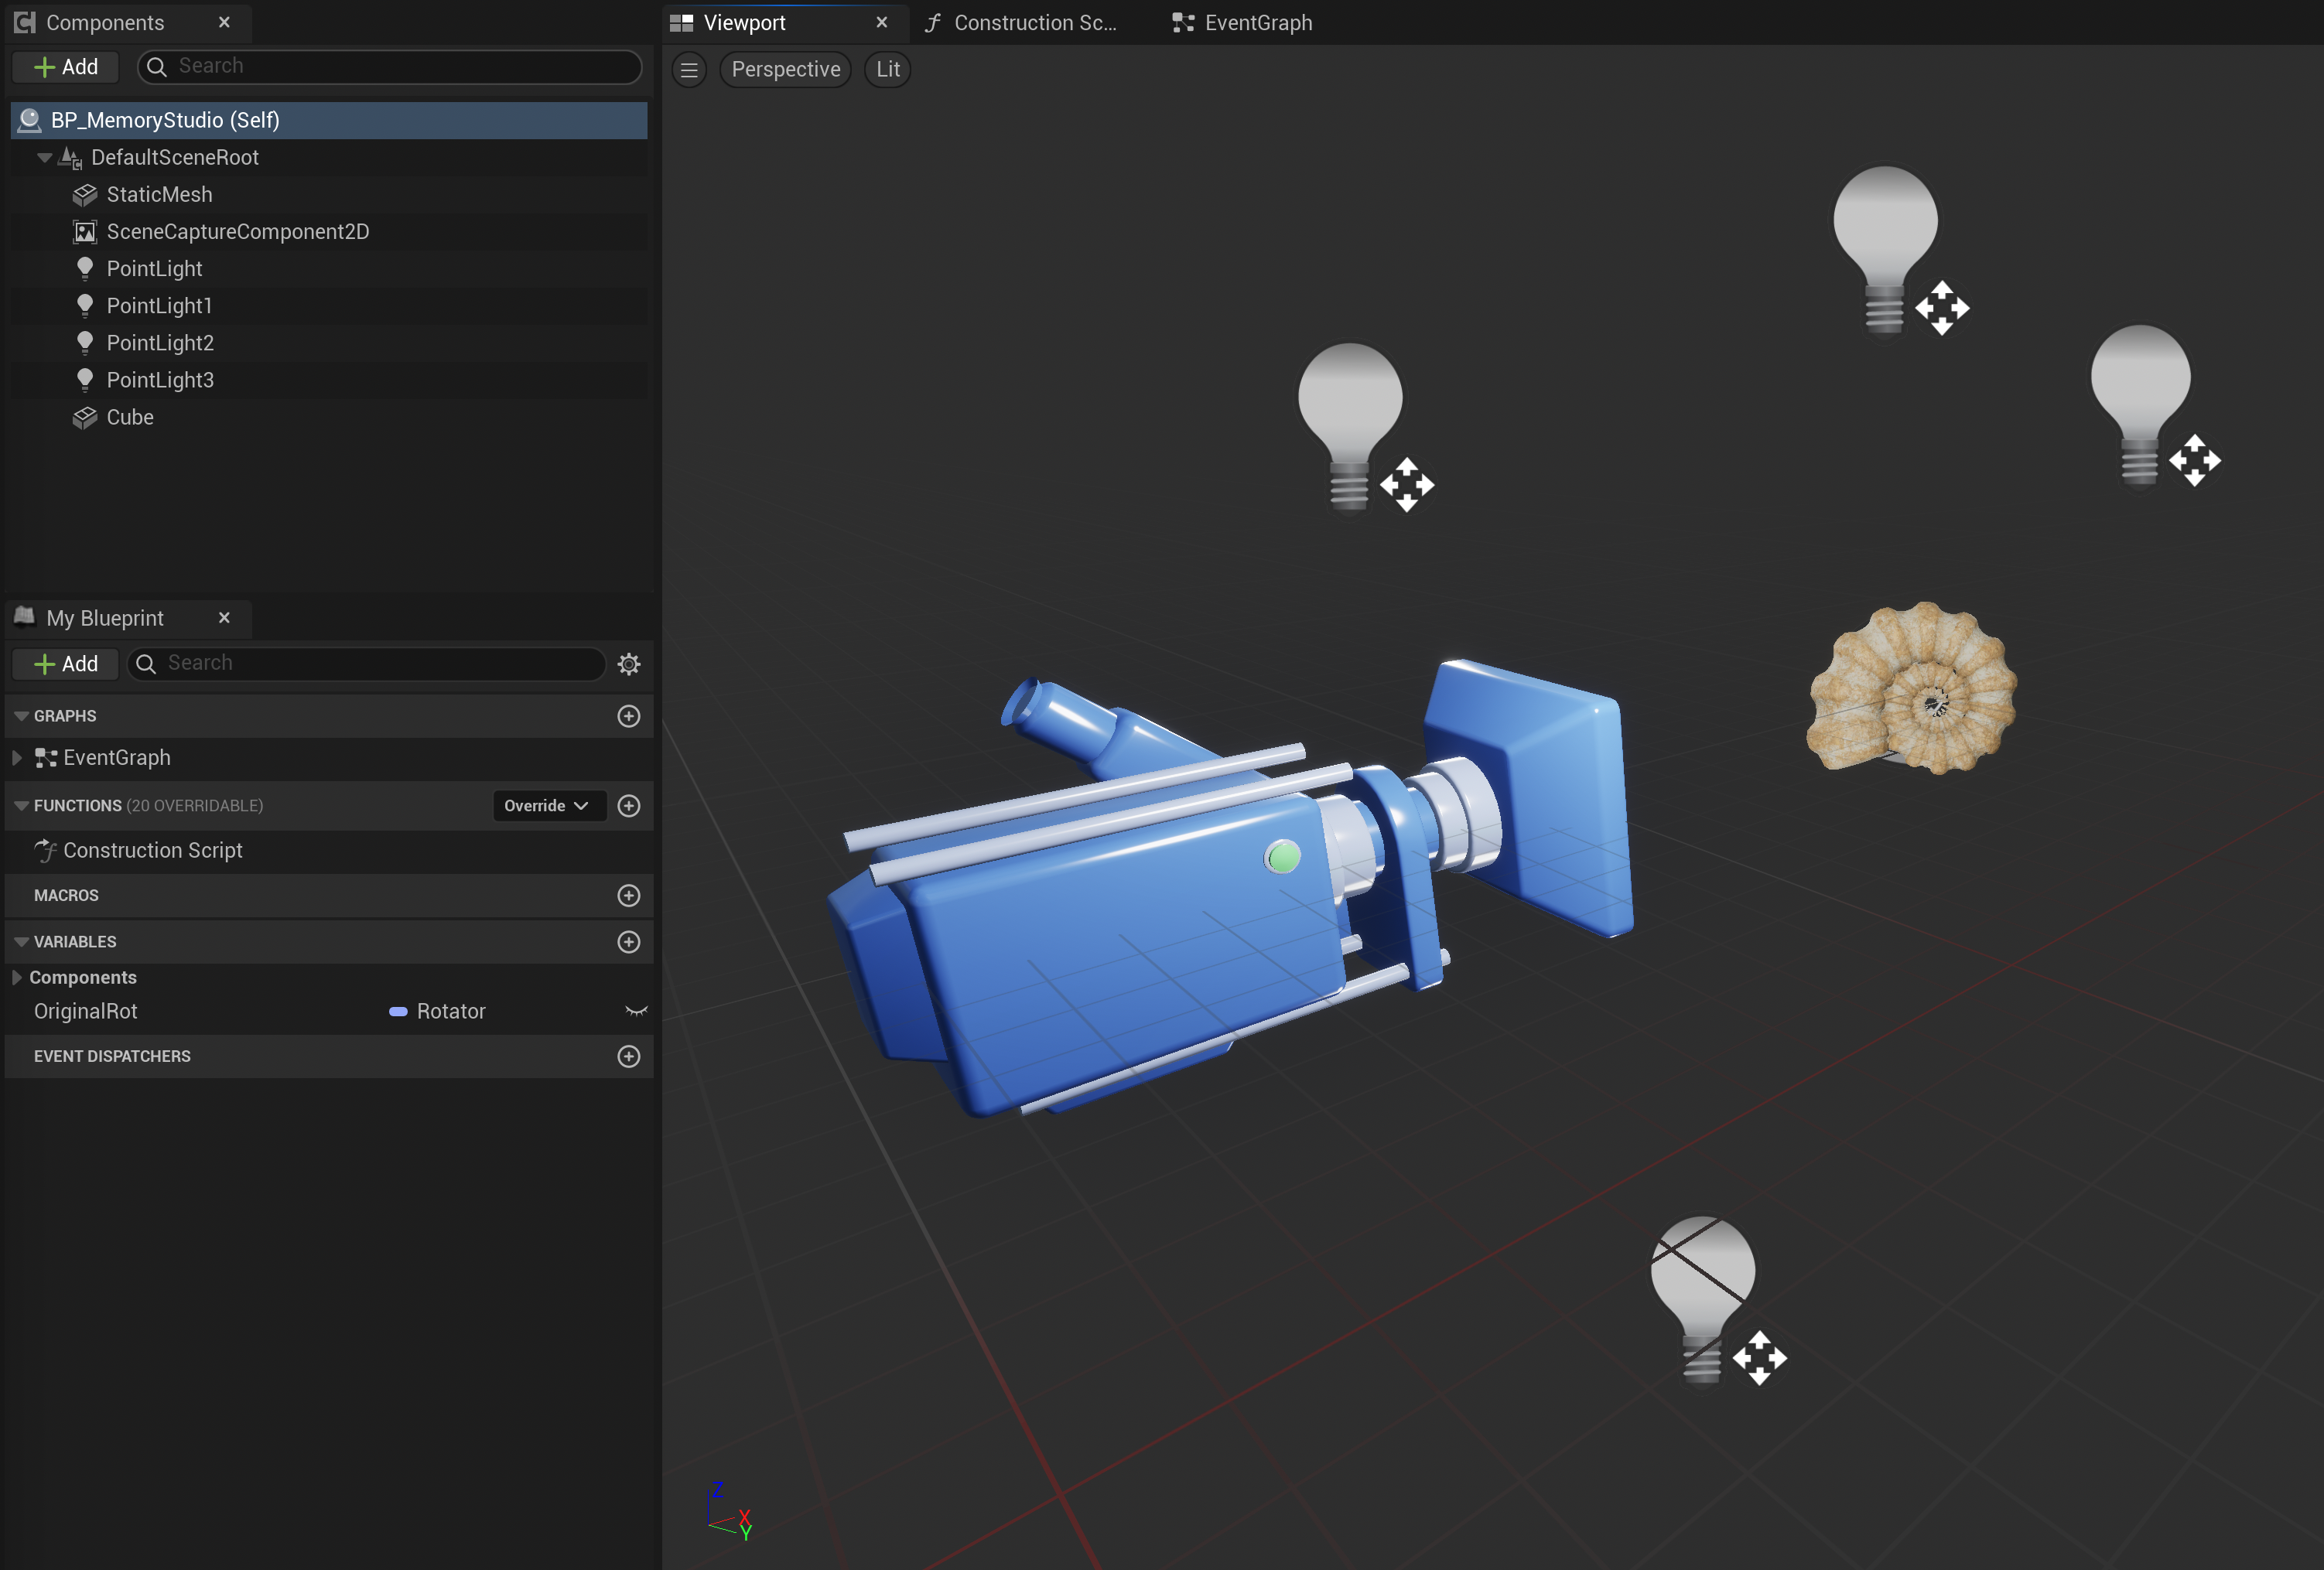
Also, while not part of this month’s work, I rebuilt the logic behind it. During the previous demo, I was using Flipbook—basically just a flat comic-strip-style system. This time, I switched to using SceneCaptureComponent2D instead. That fixed the blurry visuals that would sometimes appear during loading. Very happy with that change.
●What’s Next?
The next major milestone is applying for the Epic Mega Grants.
This will be my third attempt.
The deadline is September 22, so my goal is to finish core features by August and spend September polishing.
Big tasks ahead: quest implementation, AI migration to State Tree, redoing water effects, and more.
That’s it for this update.
I expected to finish earlier, but here I am at the end of July.
Next update is planned by August 15.
Thank you for reading and see you next time!